sagify

Sagify provides a simplified interface to manage machine learning workflows on AWS SageMaker, helping you focus on building ML models rather than infrastructure. Its modular architecture includes an LLM Gateway module to provide a unified interface for leveraging both open source and proprietary large language models. The LLM Gateway gives access to various LLMs through a simple API, letting you easily incorporate them into your workflows.

Unlock the Potential of ML and LLMs with Sagify
Are you looking to simplify your machine learning workflows and easily leverage large language models? Sagify is the solution.
Accelerate Your ML Pipelines
With Sagify, you can go from idea to deployed model in just a day. Sagify handles all the infrastructure and deployment so you can focus solely on model development.
Train, tune, and deploy ML models faster without engineering headaches. Sagify's automation empowers your team to be more productive and innovative.
Harness the Power of LLMs
Experimenting with large language models can be challenging. Leveraging OpenAI, Anthropic, Cohere and others or deploying open source LLMs requires significant effort.
Sagify eliminates these hurdles. It provides a unified platform to work with any LLM through a simple API.
Focus on what matters - leveraging LLMs to advance your use cases. Sagify allows you to spend less time on operations and more time on groundbreaking work.
The Easy Button for ML in the Cloud
Tired of configuring cloud infrastructure to train or tune models? Sagify takes care of it for you.
Just implement your model code. Sagify handles provisioning resources, distributed training, hyperparameter tuning, and deployment.
Stop wasting precious time on devops. With Sagify, your team can deliver impactful models faster than ever before.
Installation
Prerequisites
sagify requires the following:
Install sagify
At the command line:
pip install sagify
LLMs
Sagify provides a set of intuitive command-line interface (CLI) commands to simplify the management of Large Language Model (LLM) infrastructure. Whether you're exploring proprietary LLM models or open-source ones, or you want to use them in production, Sagify has you covered.
You can run sagify llm platforms to get a list of all supported backend LLM platforms:
- OpenAI
- Anthropic
- AWS Sagemaker. This option enables you to deploy open-source LLMs to AWS and leverage the powerful AWS computing platform.
The architectural design of the Sagify LLM Gateway is elegantly simple, comprising key components to facilitate seamless interaction with both proprietary and open-source Large Language Models (LLMs).
Components:
-
FastAPI Restful API: At the core of the Sagify LLM Gateway lies a FastAPI-based Restful API, serving as the unified interface for all LLM interactions. This API acts as the entry point, handling requests and orchestrating communication with underlying LLM providers.
-
Proprietary LLM Integration: For users opting to leverage proprietary LLMs such as OpenAI, the unified API interface directly interacts with these services. This streamlined integration ensures smooth communication and interoperability with proprietary LLM providers.
-
Open-Source LLM Deployment: Alternatively, users may choose to utilize open-source LLMs. In this case, these models are deployed as AWS SageMaker endpoints on the AWS cloud infrastructure. The unified API interface seamlessly communicates with these SageMaker endpoints, enabling efficient utilization of open-source LLMs within the Sagify ecosystem.
By adopting this architectural approach, the Sagify LLM Gateway offers a flexible and adaptable solution, accommodating diverse LLM requirements while maintaining simplicity and efficiency in model interactions.
Getting started - LLM Deployment with no code
-
Make sure to configure your AWS account by following the instructions at section Configure AWS Account
-
Finally, run the following command:
sagify cloud foundation-model-deploy --model-id model-txt2img-stabilityai-stable-diffusion-v2-1-base --model-version 1.* -n 1 -e ml.p3.2xlarge --aws-region us-east-1 --aws-profile sagemaker-dev
You can change the values for ec2 type (-e), aws region and aws profile with your preferred ones.
Once the Stable Diffusion model is deployed, you can use the generated code snippet to query it. Enjoy!
Restful Inference
Backend Platforms
OpenAI
The following models are offered for chat completions:
| Model Name | URL |
|---|---|
| gpt-4 | https://platform.openai.com/docs/models/gpt-4-and-gpt-4-turbo |
| gpt-4-32k | https://platform.openai.com/docs/models/gpt-4-and-gpt-4-turbo |
| gpt-3.5-turbo | https://platform.openai.com/docs/models/gpt-4-and-gpt-4-turbo |
For image creation you can rely on the following models:
| Model Name | URL |
|---|---|
| dall-e-3 | https://platform.openai.com/docs/models/dall-e |
| dall-e-2 | https://platform.openai.com/docs/models/dall-e |
And for embeddings:
| Model Name | URL |
|---|---|
| text-embedding-3-large | https://platform.openai.com/docs/models/embeddings |
| text-embedding-3-small | https://platform.openai.com/docs/models/embeddings |
| text-embedding-ada-002 | https://platform.openai.com/docs/models/embeddings |
All these lists of supported models on Openai can be retrieved by running the command sagify llm models --all --provider openai. If you want to focus only on chat completions models, then run sagify llm models --chat-completions --provider openai. For image creations and embeddings, sagify llm models --image-creations --provider openai and sagify llm models --embeddings --provider openai, respectively.
Anthropic
The following models are offered for chat completions:
| Model Name | URL |
|---|---|
| claude-2.1 | https://docs.anthropic.com/claude/docs/models-overview |
| claude-2.0 | https://docs.anthropic.com/claude/docs/models-overview |
| claude-instant-1.2 | https://docs.anthropic.com/claude/docs/models-overview |
| claude-3-opus | https://docs.anthropic.com/claude/docs/models-overview |
| claude-3-sonnet | https://docs.anthropic.com/claude/docs/models-overview |
Open-Source
The following open-source models are offered for chat completions:
| Model Name | URL |
|---|---|
| llama-2-7b | https://huggingface.co/meta-llama/Llama-2-7b |
| llama-2-13b | https://huggingface.co/meta-llama/Llama-2-13b |
| llama-2-70b | https://huggingface.co/meta-llama/Llama-2-70b |
For image creation you can rely on the following open-source models:
| Model Name | URL |
|---|---|
| stabilityai-stable-diffusion-v2 | https://huggingface.co/stabilityai/stable-diffusion-2 |
| stabilityai-stable-diffusion-v2-1-base | https://huggingface.co/stabilityai/stable-diffusion-2-1-base |
| stabilityai-stable-diffusion-v2-fp16 | https://huggingface.co/stabilityai/stable-diffusion-2/tree/fp16 |
And for embeddings:
| Model Name | URL |
|---|---|
| bge-large-en | https://huggingface.co/BAAI/bge-large-en |
| bge-base-en | https://huggingface.co/BAAI/bge-base-en |
| gte-large | https://huggingface.co/thenlper/gte-large |
| gte-base | https://huggingface.co/thenlper/gte-base |
| e5-large-v2 | https://huggingface.co/intfloat/e5-large-v2 |
| bge-small-en | https://huggingface.co/BAAI/bge-small-en |
| e5-base-v2 | https://huggingface.co/intfloat/e5-base-v2 |
| multilingual-e5-large | https://huggingface.co/intfloat/multilingual-e5-large |
| e5-large | https://huggingface.co/intfloat/e5-large |
| gte-small | https://huggingface.co/thenlper/gte-small |
| e5-base | https://huggingface.co/intfloat/e5-base |
| e5-small-v2 | https://huggingface.co/intfloat/e5-small-v2 |
| multilingual-e5-base | https://huggingface.co/intfloat/multilingual-e5-base |
| all-MiniLM-L6-v2 | https://huggingface.co/sentence-transformers/all-MiniLM-L6-v2 |
All these lists of supported open-source models are supported on AWS Sagemaker and can be retrieved by running the command sagify llm models --all --provider sagemaker. If you want to focus only on chat completions models, then run sagify llm models --chat-completions --provider sagemaker. For image creations and embeddings, sagify llm models --image-creations --provider sagemaker and sagify llm models --embeddings --provider sagemaker, respectively.
Set up OpenAI
You need to define the following env variables before you start the LLM Gateway server:
OPENAI_API_KEY: Your OpenAI API key. Example:export OPENAI_API_KEY=....OPENAI_CHAT_COMPLETIONS_MODEL: It should have one of values here or here.OPENAI_EMBEDDINGS_MODEL: It should have one of values here.OPENAI_IMAGE_CREATION_MODEL: It should have one of values here.
Set up Anthropic
You need to define the following env variables before you start the LLM Gateway server:
ANTHROPIC_API_KEY: Your OpenAI API key. Example:export ANTHROPIC_API_KEY=....ANTHROPIC_CHAT_COMPLETIONS_MODEL: It should have one of values here. Exampleexport ANTHROPIC_CHAT_COMPLETIONS_MODEL=claude-2.1
Set up open-source LLMs
First step is to deploy the LLM model(s). You can choose to deploy all backend services (chat completions, image creations, embeddings) or some of them.
If you want to deploy all of them, then run sagify llm start --all. This command will deploy all backend services (chat completions, image creations, embeddings) with the following configuration:
{
    "chat_completions": {
        "model": "llama-2-7b",
        "instance_type": "ml.g5.2xlarge",
        "num_instances": 1,
    },
    "image_creations": {
        "model": "stabilityai-stable-diffusion-v2-1-base",
        "instance_type": "ml.p3.2xlarge",
        "num_instances": 1,
    },
    "embeddings": {
        "model": "gte-small",
        "instance_type": "ml.g5.2xlarge",
        "num_instances": 1,
    },
}
You can change this configuration by suppling your own config file, then you can run sagify llm start -all --config YOUR_CONFIG_FILE.json.
It takes 15 to 30 minutes to deploy all the backend services as Sagemaker endpoints.
The deployed model names, which are the Sagemaker endpoint names, are printed out and stored in the hidden file .sagify_llm_infra.json. You can also access them from the AWS Sagemaker web console.
Deploy FastAPI LLM Gateway - Docker
Once you have set up your backend platform, you can deploy the FastAPI LLM Gateway locally.
In case of using the AWS Sagemaker platform, you need to define the following env variables before you start the LLM Gateway server:
AWS_ACCESS_KEY_ID: It can be the same one you use locally for Sagify. It should have access to Sagemaker and S3. Example:export AWS_ACCESS_KEY_ID=....AWS_SECRET_ACCESS_KEY: It can be the same one you use locally for Sagify. It should have access to Sagemaker and S3. Example:export AWS_ACCESS_KEY_ID=....AWS_REGION_NAME: AWS region where the LLM backend services (Sagemaker endpoints) are deployed.S3_BUCKET_NAME: S3 bucket name where the created images by the image creation backend service are stored.IMAGE_URL_TTL_IN_SECONDS: TTL in seconds of the temporary url to the created images. Default value: 3600.SM_CHAT_COMPLETIONS_MODEL: The Sagemaker endpoint name where the chat completions model is deployed.SM_EMBEDDINGS_MODEL: The Sagemaker endpoint name where the embeddings model is deployed.SM_IMAGE_CREATION_MODEL: The Sagemaker endpoint name where the image creation model is deployed.
In case of using the OpenAI platform, you need to define the following env variables before you start the LLM Gateway server:
OPENAI_API_KEY: Your OpenAI API key. Example:export OPENAI_API_KEY=....OPENAI_CHAT_COMPLETIONS_MODEL: It should have one of values here or here.OPENAI_EMBEDDINGS_MODEL: It should have one of values here.OPENAI_IMAGE_CREATION_MODEL: It should have one of values here.
In case of using the Anthropic platform, you need to define the following env variables before you start the LLM Gateway server:
- ANTHROPIC_API_KEY: Your Anthropic API key. Example: export ANTHROPIC_API_KEY=....
- ANTHROPIC_CHAT_COMPLETIONS_MODEL: It should have one of values here.
Now, you can run the command sagify llm gateway --image sagify-llm-gateway:v0.1.0 --start-local to start the LLM Gateway locally. You can change the name of the image via the --image argument.
This command will output the Docker container id. You can stop the container by executing docker stop <CONTAINER_ID>.
Examples
(Remember to export first all the environment variables you need)
In the case you want to create a docker image and then run it
sagify llm gateway --image sagify-llm-gateway:v0.1.0 --start-local
 ```

 If you want to use just build the image
 ```{bash}
 sagify llm gateway --image sagify-llm-gateway:v0.1.0
 ```

If you want to support both platforms (OpenAI and AWS Sagemaker), then pass all the env variables for both platforms.

#### Deploy FastAPI LLM Gateway - AWS Fargate

In case you want to deploy the LLM Gateway to AWS Fargate, then you can follow these general steps:

1. Containerize the FastAPI LLM Gateway: See previous section.
2. Push Docker image to Amazon ECR.
3. Define Task Definition: Define a task definition that describes how to run your containerized FastAPI application on Fargate. Specify the Docker image, container port, CPU and memory requirements, and environment variables.
4. Create ECS Service: Create a Fargate service using the task definition. Configure the desired number of tasks, networking options, load balancing, and auto-scaling settings.
4. Set Environment Variables: Ensure that your FastAPI application retrieves the environment variables correctly at runtime.

Here's an example CloudFormation template to deploy a FastAPI service to AWS Fargate with 5 environment variables:

```yaml
Resources:
  MyFargateTaskDefinition:
    Type: AWS::ECS::TaskDefinition
    Properties:
      Family: my-fargate-task
      ContainerDefinitions:
        - Name: fastapi-container
          Image: <YOUR_ECR_REPOSITORY_URI>
          Memory: 512
          PortMappings:
            - ContainerPort: 80
          Environment:
            - Name: AWS_ACCESS_KEY_ID
              Value: "value1"
            - Name: AWS_SECRET_ACCESS_KEY
              Value: "value2"
            - Name: AWS_REGION_NAME
              Value: "value3"
            - Name: S3_BUCKET_NAME
              Value: "value4"
            - Name: IMAGE_URL_TTL_IN_SECONDS
              Value: "value5"
            - Name: SM_CHAT_COMPLETIONS_MODEL
              Value: "value6"
            - Name: SM_EMBEDDINGS_MODEL
              Value: "value7"
            - Name: SM_IMAGE_CREATION_MODEL
              Value: "value8"
            - Name: OPENAI_CHAT_COMPLETIONS_MODEL
              Value: "value9"
            - Name: OPENAI_EMBEDDINGS_MODEL
              Value: "value10"
            - Name: OPENAI_IMAGE_CREATION_MODEL
              Value: "value11"
            - Name: ANTHROPIC_CHAT_COMPLETIONS_MODEL
              Value: "value11"
              ...

  MyFargateService:
    Type: AWS::ECS::Service
    Properties:
      Cluster: default
      TaskDefinition: !Ref MyFargateTaskDefinition
      DesiredCount: 2
      LaunchType: FARGATE
      NetworkConfiguration:
        AwsvpcConfiguration:
          Subnets:
            - <YOUR_SUBNET_ID>
          SecurityGroups:
            - <YOUR_SECURITY_GROUP_ID>
LLM Gateway API
Once the LLM Gateway is deployed, you can access it on HOST_NAME/docs.
Completions
Code samples
Shell
curl --location --request POST '/v1/chat/completions' \
--header 'Content-Type: application/json' \
--data-raw '{
    "provider": "sagemaker",
     "messages": [
      {
        "role": "system",
        "content": "you are a cook"
      },
      {
        "role": "user",
        "content": "what is the recipe of mayonnaise"
      }
    ],
    "temperature": 0,
    "max_tokens": 600,
    "top_p": 0.9,
    "seed": 32
}'
Javascript
const inputBody = '{
  "provider": "sagemaker",
  "messages": [
      {
        "role": "system",
        "content": "you are a cook"
      },
      {
        "role": "user",
        "content": "what is the recipe of mayonnaise"
      }
  ],
  "temperature": 0,
  "max_tokens": 600,
  "top_p": 0.9,
  "seed": 32
}';
const headers = {
  'Content-Type':'application/json',
  'Accept':'application/json'
};

fetch('/v1/chat/completions',
{
  method: 'POST',
  body: inputBody,
  headers: headers
})
.then(function(res) {
    return res.json();
}).then(function(body) {
    console.log(body);
});
Python
import requests
import json

url = "/v1/chat/completions"

payload = json.dumps({
  "provider": "sagemaker",
  "messages": [
    {
      "role": "system",
      "content": "you are a cook"
    },
    {
      "role": "user",
      "content": "what is the recipe of mayonnaise"
    }
  ],
  "temperature": 0,
  "max_tokens": 600,
  "top_p": 0.9,
  "seed": 32
})
headers = {
  'Content-Type': 'application/json'
}

response = requests.request("POST", url, headers=headers, data=payload)

print(response.text)
POST /v1/chat/completions
Create a model response for the given chat conversation
{
  "provider": "openai|sagemaker|anthropic",
  "model": "string", # optional
  "messages": [
    {
      "role": "system|user|assistant",
      "content": "string"
    }
  ],
  "temperature": 0, # optional
  "max_tokens": 0,
  "top_p": 0, # optional
  "seed": 0 # optional
}
Example responses
200 Response
{
    "id": "chatcmpl-8167b99c-f22b-4e04-8e26-4ca06d58dc86",
    "object": "chat.completion",
    "created": 1708765682,
    "provider": "sagemaker",
    "model": "meta-textgeneration-llama-2-7b-f-2024-02-24-08-49-32-123",
    "choices": [
        {
            "index": 0,
            "message": {
                "role": "assistant",
                "content": " Ah, a fellow foodie! Mayonnaise is a classic condiment that's easy to make and can elevate any dish. Here's my trusty recipe for homemade mayonnaise:\n\nIngredients:\n\n* 2 egg yolks\n* 1/2 cup (120 ml) neutral-tasting oil, such as canola or grapeseed\n* 1 tablespoon lemon juice or vinegar\n* Salt and pepper to taste\n\nInstructions:\n\n1. In a small bowl, whisk together the egg yolks and lemon juice or vinegar until well combined.\n2. Slowly pour in the oil while continuously whisking the mixture. You can do this by hand with a whisk or use an electric mixer on low speed.\n3. Continue whisking until the mixture thickens and emulsifies, which should take about 5-7 minutes. You'll know it's ready when it reaches a thick, creamy consistency.\n4. Taste and adjust the seasoning as needed. You can add more salt, pepper, or lemon juice to taste.\n5. Transfer the mayonnaise to a jar or airtight container and store it in the fridge for up to 1 week.\n\nThat's it! Homemade mayonnaise is a great way to control the ingredients and flavor, and it's also a fun kitchen experiment. Enjoy!"
            }
        }
    ]
}
Embeddings
Code samples
Shell
curl --location --request POST '/v1/embeddings' \
--header 'Content-Type: application/json' \
--data-raw '{
  "provider": "sagemaker",
  "input": [
    "The mayonnaise was delicious"
  ]
}'
Javascript
const inputBody = '{
  "provider": "sagemaker",
  "model": "string",
  "input": [
    "The mayonnaise was delicious"
  ]
}';
const headers = {
  'Content-Type':'application/json',
  'Accept':'application/json'
};

fetch('/v1/embeddings',
{
  method: 'POST',
  body: inputBody,
  headers: headers
})
.then(function(res) {
    return res.json();
}).then(function(body) {
    console.log(body);
});
Python
import requests
import json

url = "/v1/embeddings"

payload = json.dumps({
  "provider": "sagemaker",
  "input": [
    "The mayonnaise was delicious"
  ]
})
headers = {
  'Content-Type': 'application/json'
}

response = requests.request("POST", url, headers=headers, data=payload)

print(response.text)
POST /v1/embeddings
Create
{
  "provider": "openai|sagemaker|anthropic",
  "model": "string", # optional
  "input": [
    "string"
  ]
}
Example responses
200 Response
{
    "data": [
        {
            "object": "embedding",
            "embedding": [
                -0.04274585098028183,
                0.021814687177538872,
                -0.004705613013356924,
                ...
                -0.07548460364341736,
                0.036427777260541916,
                0.016453085467219353,
                0.004641987383365631,
                -0.0072729517705738544,
                0.02343473769724369,
                -0.002924458822235465,
                0.0339619480073452,
                0.005262510851025581,
                -0.06709178537130356,
                -0.015170316211879253,
                -0.04612169787287712,
                -0.012380547821521759,
                -0.006663458421826363,
                -0.0573800653219223,
                0.007938326336443424,
                0.03486081212759018,
                0.021514462307095528
            ],
            "index": 0
        }
    ],
    "provider": "sagemaker",
    "model": "hf-sentencesimilarity-gte-small-2024-02-24-09-24-27-341",
    "object": "list"
}
Image Generations
Code samples
Shell
curl --location --request POST '/v1/images/generations' \
--header 'Content-Type: application/json' \
--data-raw '{
  "provider": "sagemaker",
  "prompt":
    "A baby sea otter"
  ,
  "n": 1,
  "width": 512,
  "height": 512,
  "seed": 32,
  "response_format": "url"
}'
const inputBody = '{
  "provider": "sagemaker",
  "prompt": "A baby sea otter",
  "n": 1,
  "width": 512,
  "height": 512,
  "seed": 32,
  "response_format": "url"
}';
const headers = {
  'Content-Type':'application/json',
  'Accept':'application/json'
};

fetch('/v1/images/generations',
{
  method: 'POST',
  body: inputBody,
  headers: headers
})
.then(function(res) {
    return res.json();
}).then(function(body) {
    console.log(body);
});
Python
import requests
import json

url = "/v1/images/generations"

payload = json.dumps({
  "provider": "sagemaker",
  "prompt": "A baby sea otter",
  "n": 1,
  "width": 512,
  "height": 512,
  "seed": 32,
  "response_format": "url"
})
headers = {
  'Content-Type': 'application/json'
}

response = requests.request("POST", url, headers=headers, data=payload)

print(response.text)
POST /v1/images/generations
Create
{
  "provider": "sagemaker|openai|anthropic",
  "model": "string", # optional
  "prompt": "string",
  "n": 0,
  "width": 0,
  "height": 0,
  "seed": 0, # optional
  "response_format": "url"
}
- OpenAI: The size of the generated images. Must be one of 256x256, 512x512, or 1024x1024 for dall-e-2. Must be one of 1024x1024, 1792x1024, or 1024x1792 for dall-e-3 models.
- StableDiffusion (Sagemaker): If you get 500, that means that probaly the deployed model on the Sagemaker endpoint was out of memory. You'll need an instance with most memory.
Example responses
200 Response
{
    "provider": "sagemaker",
    "model": "stable-diffusion-v2-1-base-2024-02-24-11-43-32-177",
    "created": 1708775601,
    "data": [
        {
            "url": "https://your-bucket.s3.amazonaws.com/31cedd17-ccd7-4cba-8dea-cb7e8b915782.png?AWSAccessKeyId=AKIAUKEQBDHITP26MLXH&Signature=%2Fd1J%2FUjOWbRnP5cwtkSzYUVoEoo%3D&Expires=1708779204"
        }
    ]
}
The above example returns a url to the image. If you want to return a base64 value of the image, then set response_format to base64_json in the request body params.
Upcoming Proprietary & Open-Source LLMs and Cloud Platforms
Batch Inference
In the realm of AI/ML, real-time inference via RESTful APIs is undeniably crucial for many applications. However, another equally important, yet often overlooked, aspect of inference lies in batch processing.
While real-time inference caters to immediate, on-the-fly predictions, batch inference empowers users with the ability to process large volumes of data efficiently and cost-effectively.
Embeddings
Generating embeddings offline in a batch mode is essential for many real world applications. These embeddings can then be stored in some vector database to serve recommender, search/ranking and other ML powered systems.
You have to use Sagemaker as the backend platform and only the following open-source models are supported:
| Model Name | URL |
|---|---|
| bge-large-en | https://huggingface.co/BAAI/bge-large-en |
| bge-base-en | https://huggingface.co/BAAI/bge-base-en |
| gte-large | https://huggingface.co/thenlper/gte-large |
| gte-base | https://huggingface.co/thenlper/gte-base |
| e5-large-v2 | https://huggingface.co/intfloat/e5-large-v2 |
| bge-small-en | https://huggingface.co/BAAI/bge-small-en |
| e5-base-v2 | https://huggingface.co/intfloat/e5-base-v2 |
| multilingual-e5-large | https://huggingface.co/intfloat/multilingual-e5-large |
| e5-large | https://huggingface.co/intfloat/e5-large |
| gte-small | https://huggingface.co/thenlper/gte-small |
| e5-base | https://huggingface.co/intfloat/e5-base |
| e5-small-v2 | https://huggingface.co/intfloat/e5-small-v2 |
| multilingual-e5-base | https://huggingface.co/intfloat/multilingual-e5-base |
| all-MiniLM-L6-v2 | https://huggingface.co/sentence-transformers/all-MiniLM-L6-v2 |
Also, the following ec2 instance types support batch inference:
| Instance Type | Details |
|---|---|
| ml.p3.2xlarge | https://instances.vantage.sh/aws/ec2/p3.2xlarge |
| ml.p3.8xlarge | https://instances.vantage.sh/aws/ec2/p3.8xlarge |
| ml.p3.16xlarge | https://instances.vantage.sh/aws/ec2/p3.16xlarge |
| ml.g4dn.2xlarge | https://instances.vantage.sh/aws/ec2/g4dn.2xlarge |
| ml.g4dn.4xlarge | https://instances.vantage.sh/aws/ec2/g4dn.4xlarge |
| ml.g4dn.8xlarge | https://instances.vantage.sh/aws/ec2/g4dn.8xlarge |
| ml.g4dn.16xlarge | https://instances.vantage.sh/aws/ec2/g4dn.16xlarge |
How does it work?
It's quite simple. To begin, prepare the input JSONL file(s). Consider the following example:
{"id":1,"text_inputs":"what is the recipe of mayonnaise?"}
{"id":2,"text_inputs":"what is the recipe of fish and chips?"}
Each line contains a unique identifier (id) and the corresponding text input (text_inputs). This identifier is crucial for linking inputs to their respective outputs, as illustrated in the output format below:
{'id': 1, 'embedding': [-0.029919596, -0.0011845357, ..., 0.08851079, 0.021398442]}
{'id': 2, 'embedding': [-0.041918136, 0.007127975, ..., 0.060178414, 0.031050885]}
By ensuring consistency in the id field between input and output files, you empower your ML use cases with seamless data coherence.
Once the input JSONL file(s) are saved in an S3 bucket, you can trigger the batch inference programmatically from your Python codebase or via the Sagify CLI.
CLI
The following command does all the magic! Here's an example:
sagify llm batch-inference --model gte-small --s3-input-location s3://sagify-llm-playground/batch-input-data-example/embeddings/ --s3-output-location s3://sagify-llm-playground/batch-output-data-example/embeddings/1/ --aws-profile sagemaker-dev --aws-region us-east-1 --num-instances 1 --ec2-type ml.p3.2xlarge --wait
The --s3-input-location should be the path where the JSONL file(s) are saved.
SDK
Magic can happen with the Sagify SDK, too. Here's a code snippet:
from sagify.api.llm import batch_inference

batch_inference(
    model='gte-small',
    s3_input_location='3://sagify-llm-playground/batch-input-data-example/embeddings/',
    s3_output_location='s3://sagify-llm-playground/batch-output-data-example/embeddings/1/',
    aws_profile='sagemaker-dev',
    aws_region='us-east-1',
    num_instances=1,
    ec2_type='ml.p3.2xlarge',
    aws_access_key_id='YOUR_AWS_ACCESS_KEY_ID'
    aws_secret_access_key='YOUR_AWS_SECRET_ACCESS_KEY',
    wait=True
)
Machine Learning
Getting started - Custom Training and Deployment
Step 1: Clone Machine Learning demo repository
You're going to clone and train a Machine Learning codebase to train a classifier for the Iris data set.
Clone repository:
git clone https://github.com/Kenza-AI/sagify-demo.git
Cd into the cloned repo:
cd sagify-demo
Create environment:
mkvirtualenv sagify-demo
Don't forget to activate the virtualenv after the creation of environment by executing workon sagify-demo.
Install dependencies:
make requirements
Step 2: Initialize sagify
sagify init
Type in sagify-demo for SageMaker app name, N in question Are you starting a new project?, src for question Type in the directory where your code lives and make sure to choose your preferred Python version, AWS profile and region. Finally, type requirements.txt in question Type in the path to requirements.txt.
A module called sagify_base is created under the src directory. The structure is:
sagify_base/
    local_test/
        test_dir/
            input/
                config/
                    hyperparameters.json
                data/
                    training/
            model/
            output/
        deploy_local.sh
        train_local.sh
    prediction/
        __init__.py
        nginx.conf
        predict.py
        prediction.py
        predictor.py
        serve
        wsgi.py
    training/
        __init__.py
        train
        training.py
    __init__.py
    build.sh
    Dockerfile
    executor.sh
    push.sh
Step 3: Integrate sagify
As a Machine Learning engineer, you only need to conduct a few actions. Sagify takes care of the rest:
- Copy a subset of training data under
sagify_base/local_test/test_dir/input/data/training/to test that training works locally - Implement
train(...)function insagify_base/training/training.py - Implement
predict(...)function insagify_base/prediction/prediction.py - Optionally, specify hyperparameters in
sagify_base/local_test/test_dir/input/config/hyperparameters.json
Hence,
- Copy
iris.datafiles fromdatatosagify_base/local_test/test_dir/input/data/training/:
cp ./data/iris.data ./src/sagify_base/local_test/test_dir/input/data/training/
- Replace the
TODOsin thetrain(...)function insagify_base/training/training.pyfile with:
input_file_path = os.path.join(input_data_path, 'iris.data')
clf, accuracy = training_logic(input_file_path=input_file_path)

output_model_file_path = os.path.join(model_save_path, 'model.pkl')
joblib.dump(clf, output_model_file_path)

accuracy_report_file_path = os.path.join(model_save_path, 'report.txt')
with open(accuracy_report_file_path, 'w') as _out:
    _out.write(str(accuracy))
and at the top of the file, add:
import os

import joblib

from iris_training import train as training_logic
- Replace the body of
predict(...)function insagify_base/prediction/prediction.pywith:
model_input = json_input['features']
prediction = ModelService.predict(model_input)

return {
    "prediction": prediction.item()
}
and replace the body of get_model() function in ModelService class in the same file with:
if cls.model is None:
    import joblib
    cls.model = joblib.load(os.path.join(_MODEL_PATH, 'model.pkl'))
return cls.model
Step 4: Build Docker image
It's time to build the Docker image that will contain the Machine Learning codebase:
sagify build
If you run docker images | grep sagify-demo in your terminal, you'll see the created Sagify-Demo image.
Step 5: Train model
Time to train the model for the Iris data set in the newly built Docker image:
sagify local train
Model file model.pkl and report file report.txt are now under sagify_base/local_test/test_dir/model/
Step 6: Deploy model
Finally, serve the model as a REST Service:
sagify local deploy
Run the following curl command on your terminal to verify that the REST Service works:
curl -X POST \
http://localhost:8080/invocations \
-H 'Cache-Control: no-cache' \
-H 'Content-Type: application/json' \
-d '{
    "features":[[0.34, 0.45, 0.45, 0.3]]
}'
It will be slow in the first couple of calls as it loads the model in a lazy manner.
Voila! That's a proof that this Machine Learning model is going to be trained and deployed on AWS SageMaker successfully. Now, go to the Usage section in Sagify Docs to see how to train and deploy this Machine Learning model to AWS SageMaker!
Classic Machine Learning Usage
Push Docker Image to AWS ECR
If you have followed all the steps of Getting Started, run sagify push to push the Docker image to AWS ECR. This step may take some time depending on your internet connection upload speed.
Create S3 Bucket
Make sure to create an S3 bucket with a name of your choice, for example: sagify-demo
Upload Training Data
Execute sagify cloud upload-data -i data/ -s s3://sagify-demo/training-data to upload training data to S3
Train on AWS SageMaker
Execute sagify cloud train -i s3://sagify-demo/training-data/ -o s3://sagify-demo/output/ -e ml.m4.xlarge to train the Machine Learning model on SageMaker. This command will use the pushed Docker image.
Copy the displayed Model S3 location after the command is executed (example: s3://sagify-demo/output/sagify-demo-2018-04-29-15-04-14-483/output/model.tar.gz)
Deploy on AWS SageMaker
Execute sagify cloud deploy -m s3://sagify-demo/output/.../output/model.tar.gz -n 3 -e ml.m4.xlarge to deploy the model on SageMaker.
Call SageMaker REST Endpoint
Find the endpoint URL under Endpoints in AWS SageMaker service on AWS console. Please, refer to https://docs.aws.amazon.com/apigateway/latest/developerguide/how-to-use-postman-to-call-api.html on how to call it from Postman as authorization is required.
Remember that it's a POST HTTP request with Content-Type application/json, and the request JSON body is of the form:
{
    "features":[[0.34, 0.45, 0.45, 0.3]]
}
Hyperparameter Optimization
Given that you have configured your AWS Account as described in the previous section, you're now ready to perform Bayesian Hyperparameter Optimization on AWS SageMaker! The process is similar to training step.
Step 1: Define Hyperparameter Configuration File
Define the Hyperparameter Configuration File. More specifically, you need to specify in a local JSON file the ranges for the hyperparameters, the name of the objective metric and its type (i.e. Maximize or Minimize). For example:
{
    "ParameterRanges": {
        "CategoricalParameterRanges": [
            {
                "Name": "kernel",
                "Values": ["linear", "rbf"]
            }
        ],
        "ContinuousParameterRanges": [
        {
          "MinValue": 0.001,
          "MaxValue": 10,
          "Name": "gamma"
        }
        ],
        "IntegerParameterRanges": [
            {
                "Name": "C",
                "MinValue": 1,
                "MaxValue": 10
            }
        ]
    },
    "ObjectiveMetric": {
        "Name": "Precision",
        "Type": "Maximize"
    }
}
Step 2: Implement Train function
Replace the TODOs in the train(...) function in sagify_base/training/training.py file with your logic. For example:
from sklearn import datasets
iris = datasets.load_iris()

# Read the hyperparameter config json file
import json
with open(hyperparams_path) as _in_file:
    hyperparams_dict = json.load(_in_file)

from sklearn import svm
clf = svm.SVC(
    gamma=float(hyperparams_dict['gamma']),  # Values will be read as strings, so make sure to convert them to the right data type
    C=float(hyperparams_dict['C']),
    kernel=hyperparams_dict['kernel']
)

from sklearn.model_selection import train_test_split
X_train, X_test, y_train, y_test = train_test_split(
    iris.data, iris.target, test_size=0.3, random_state=42)

clf.fit(X_train, y_train)

from sklearn.metrics import precision_score

predictions = clf.predict(X_test)

precision = precision_score(y_test, predictions, average='weighted')

# Log the objective metric name with its calculated value. In tis example is Precision.
# The objective name should be exactly the same with the one specified in the hyperparams congig json file.
# The value must be a numeric (float or int).
from sagify.api.hyperparameter_tuning import log_metric
name = "Precision"
log_metric(name, precision)

from joblib import dump
dump(clf, os.path.join(model_save_path, 'model.pkl'))

print('Training complete.')
Step 3: Build and Push Docker image
sagify buildMake sure sagify is in yourrequirements.txtfile.sagify push
Step 4: Call The CLI Command
And, finally, call the hyperparameter-optimization CLI command. For example:
sagify cloud hyperparameter-optimization -i s3://my-bucket/training-data/ -o s3://my-bucket/output/ -e ml.m4.xlarge -h local/path/to/hyperparam_ranges.json
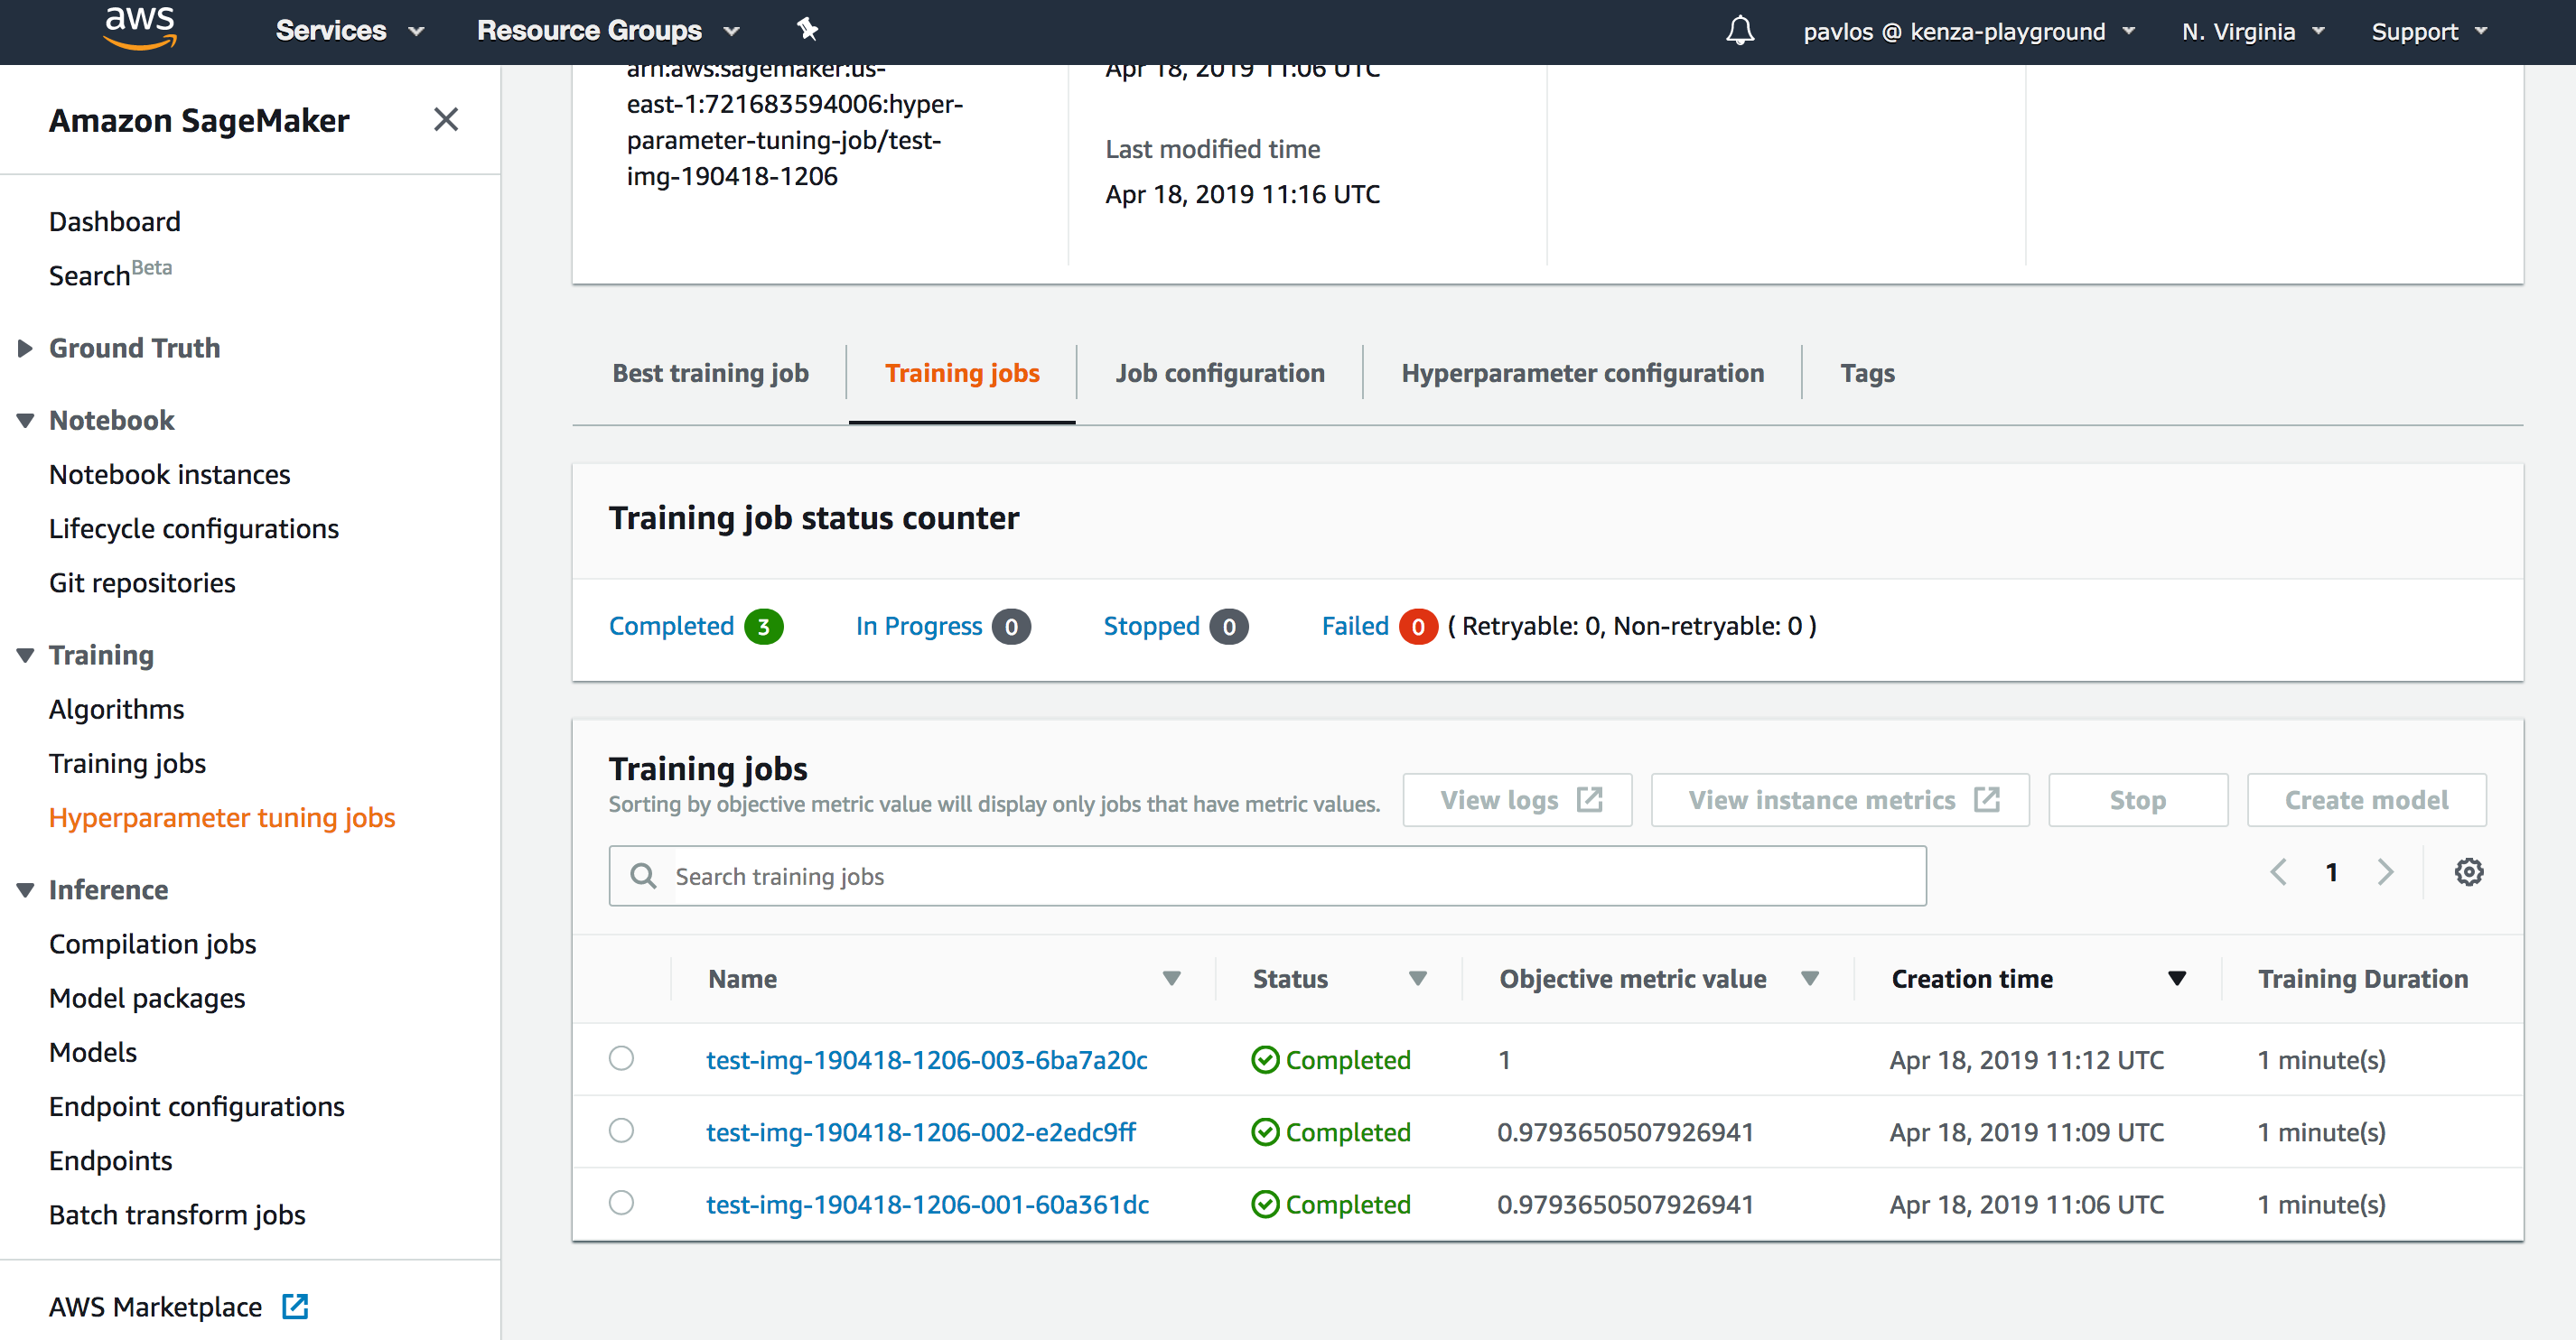
Step 5: Monitor Progress
You can monitor the progress via the SageMaker UI console. Here is an example of a finished Hyperparameter Optimization job:
AWS Account Setup
Configure AWS Account
- Sign in to the AWS Management Console as an IAM user and open the IAM console at https://console.aws.amazon.com/iam/
- Select
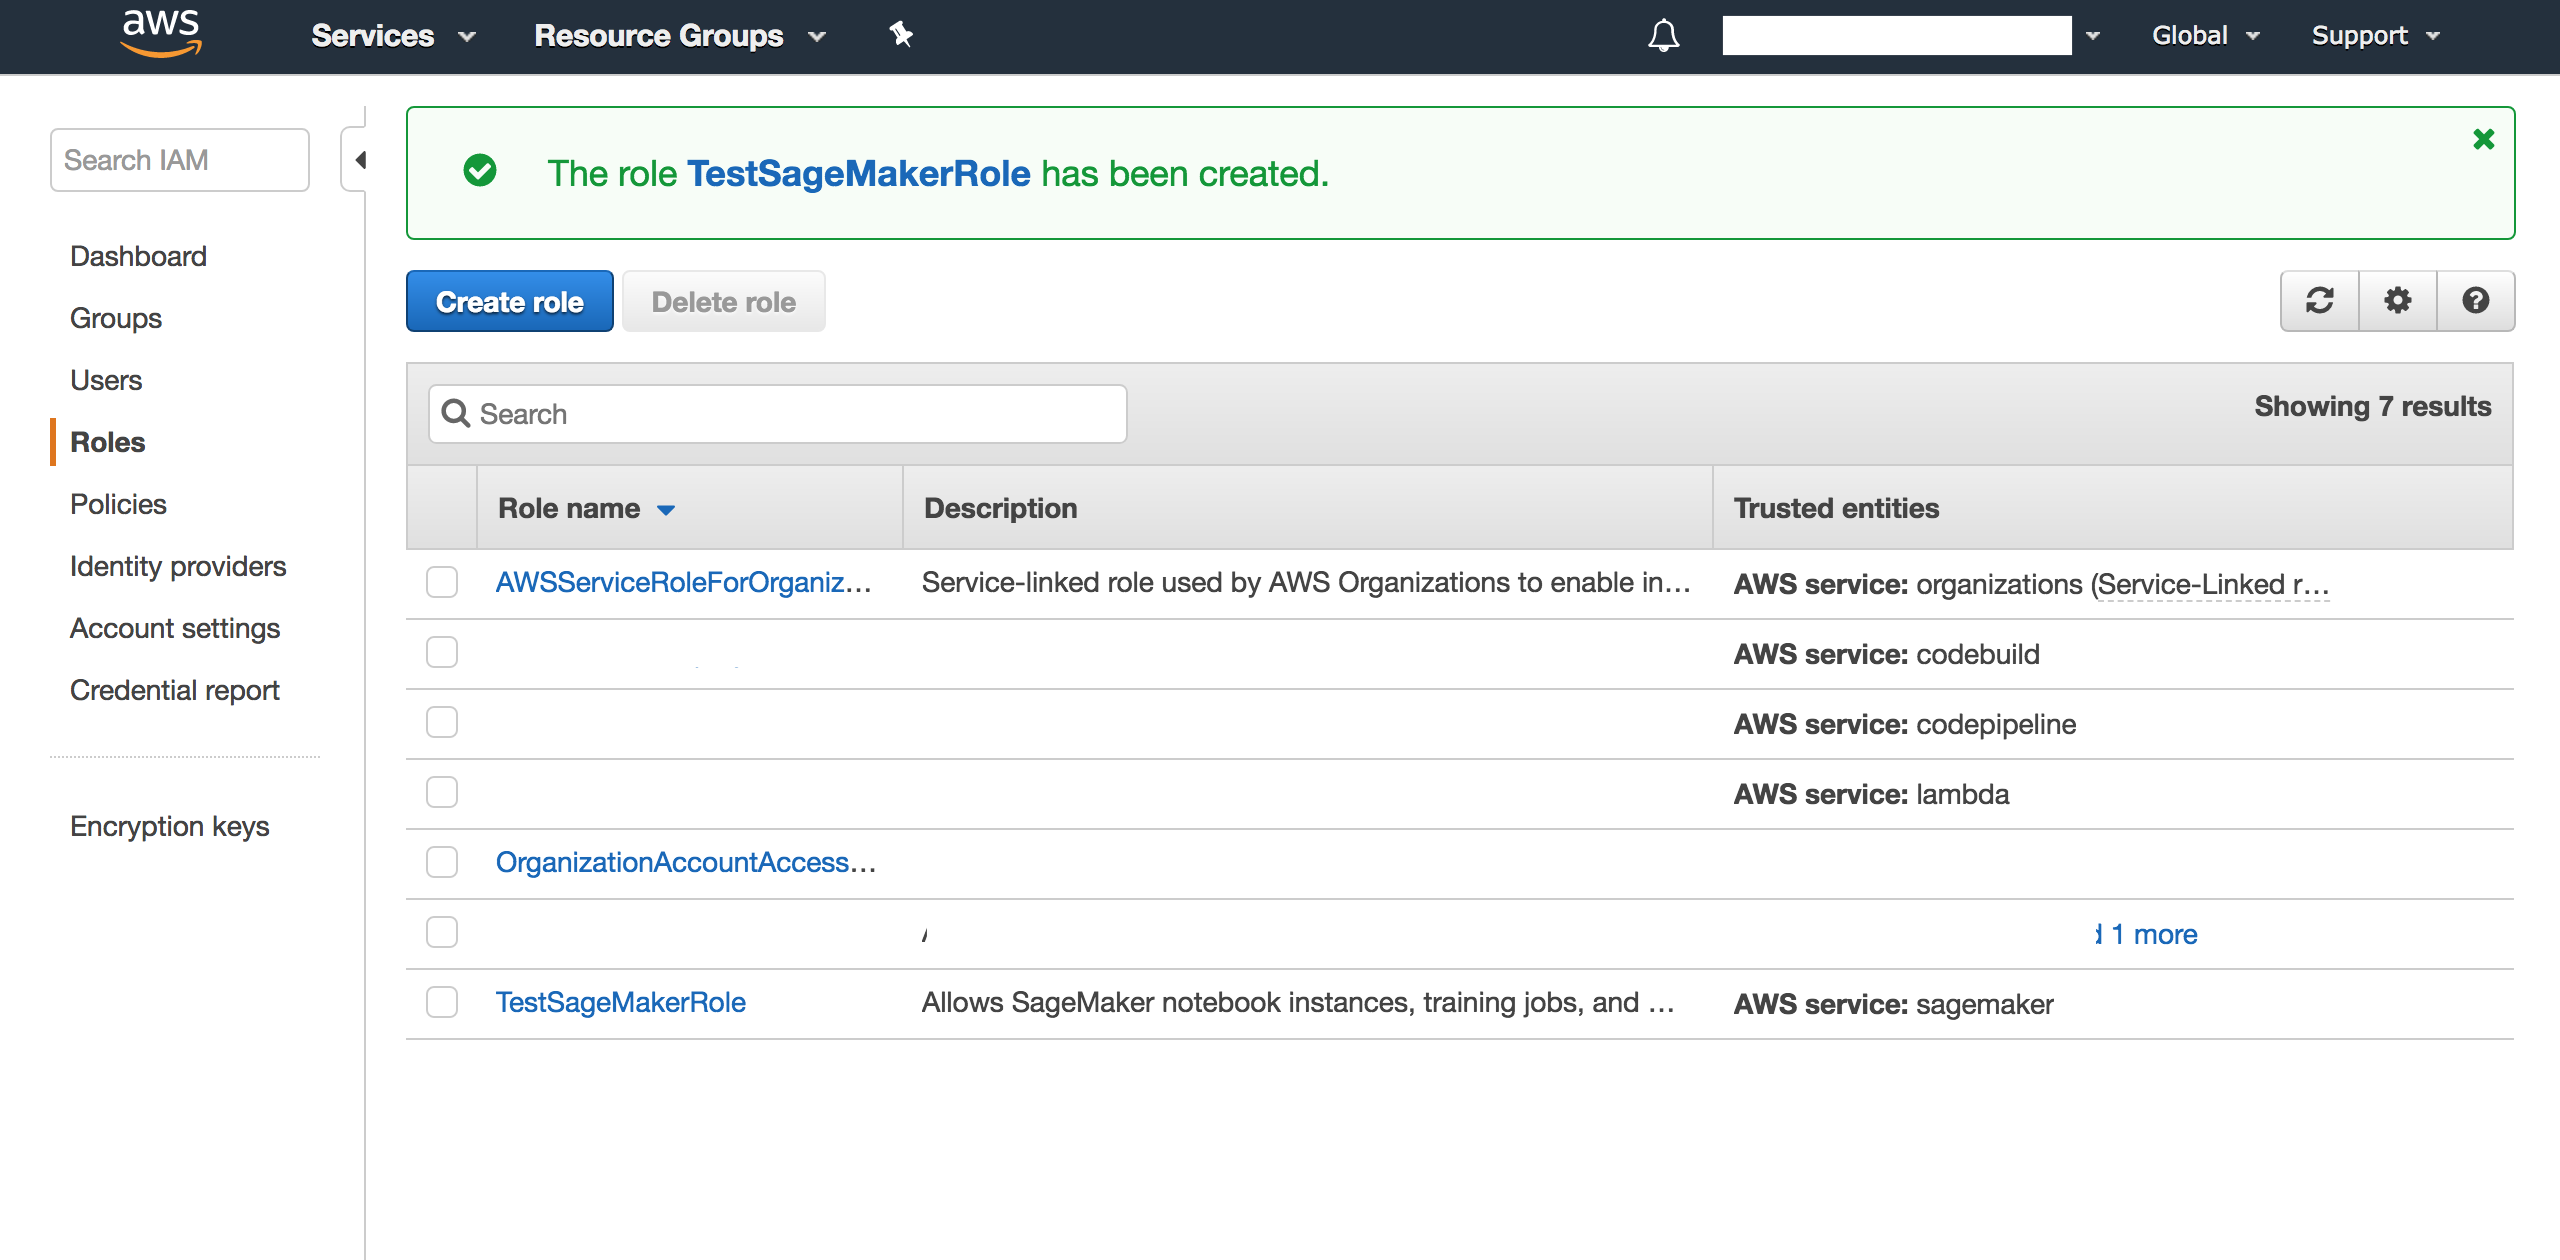
Rolesfrom the list in the left-hand side, and click on Create role - Then, select SageMaker as the image shows:
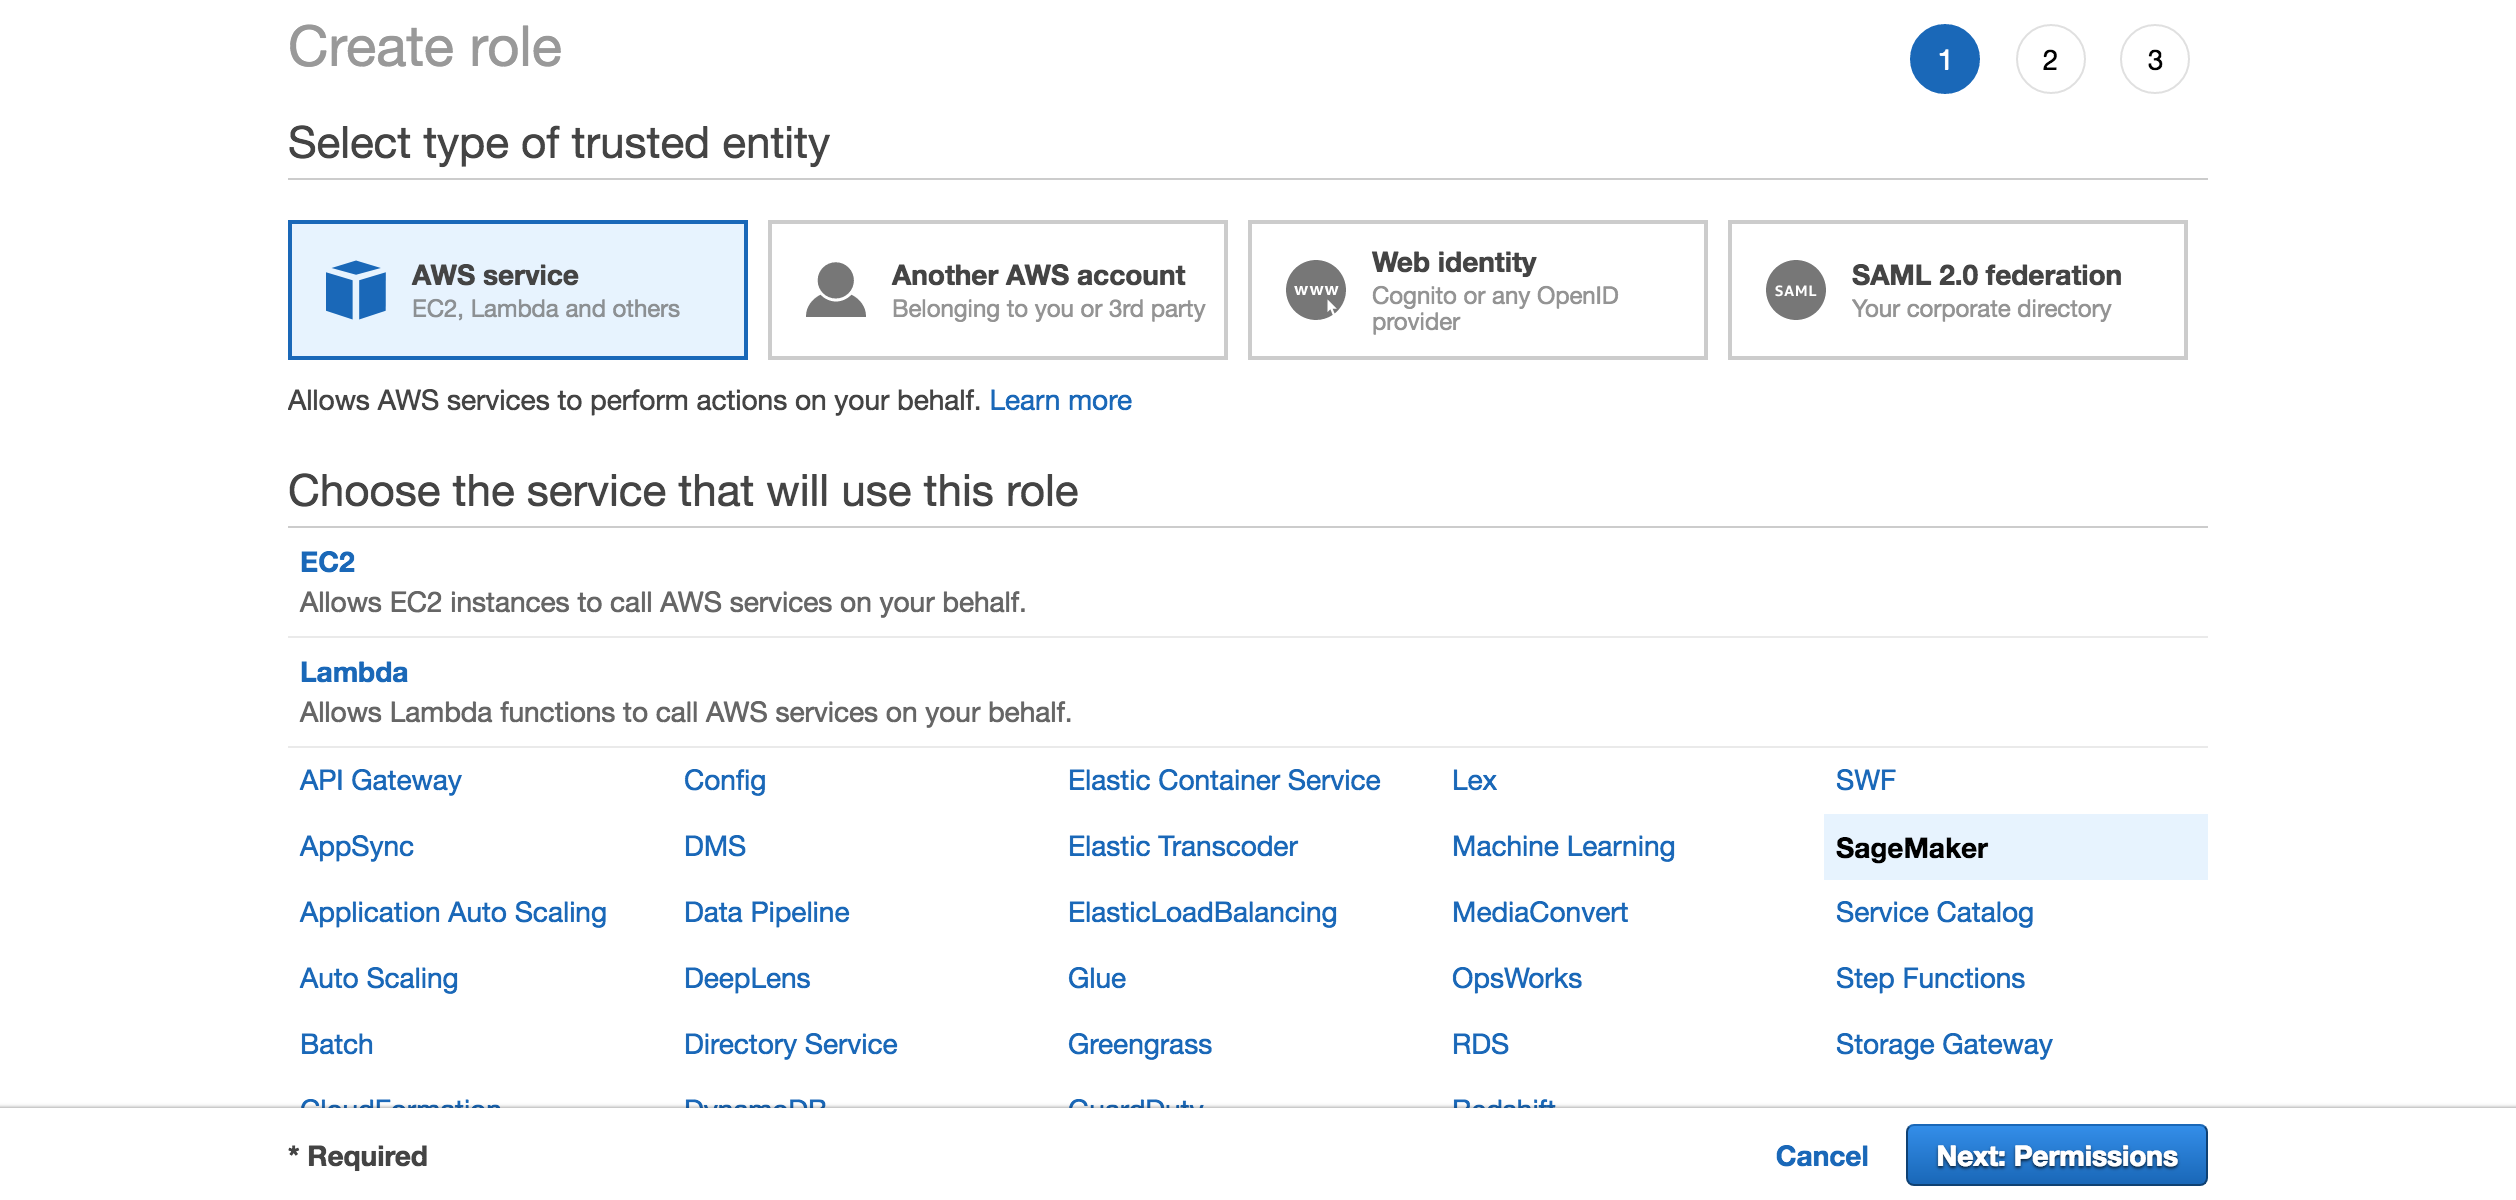
- Click Next: Review on the following page:
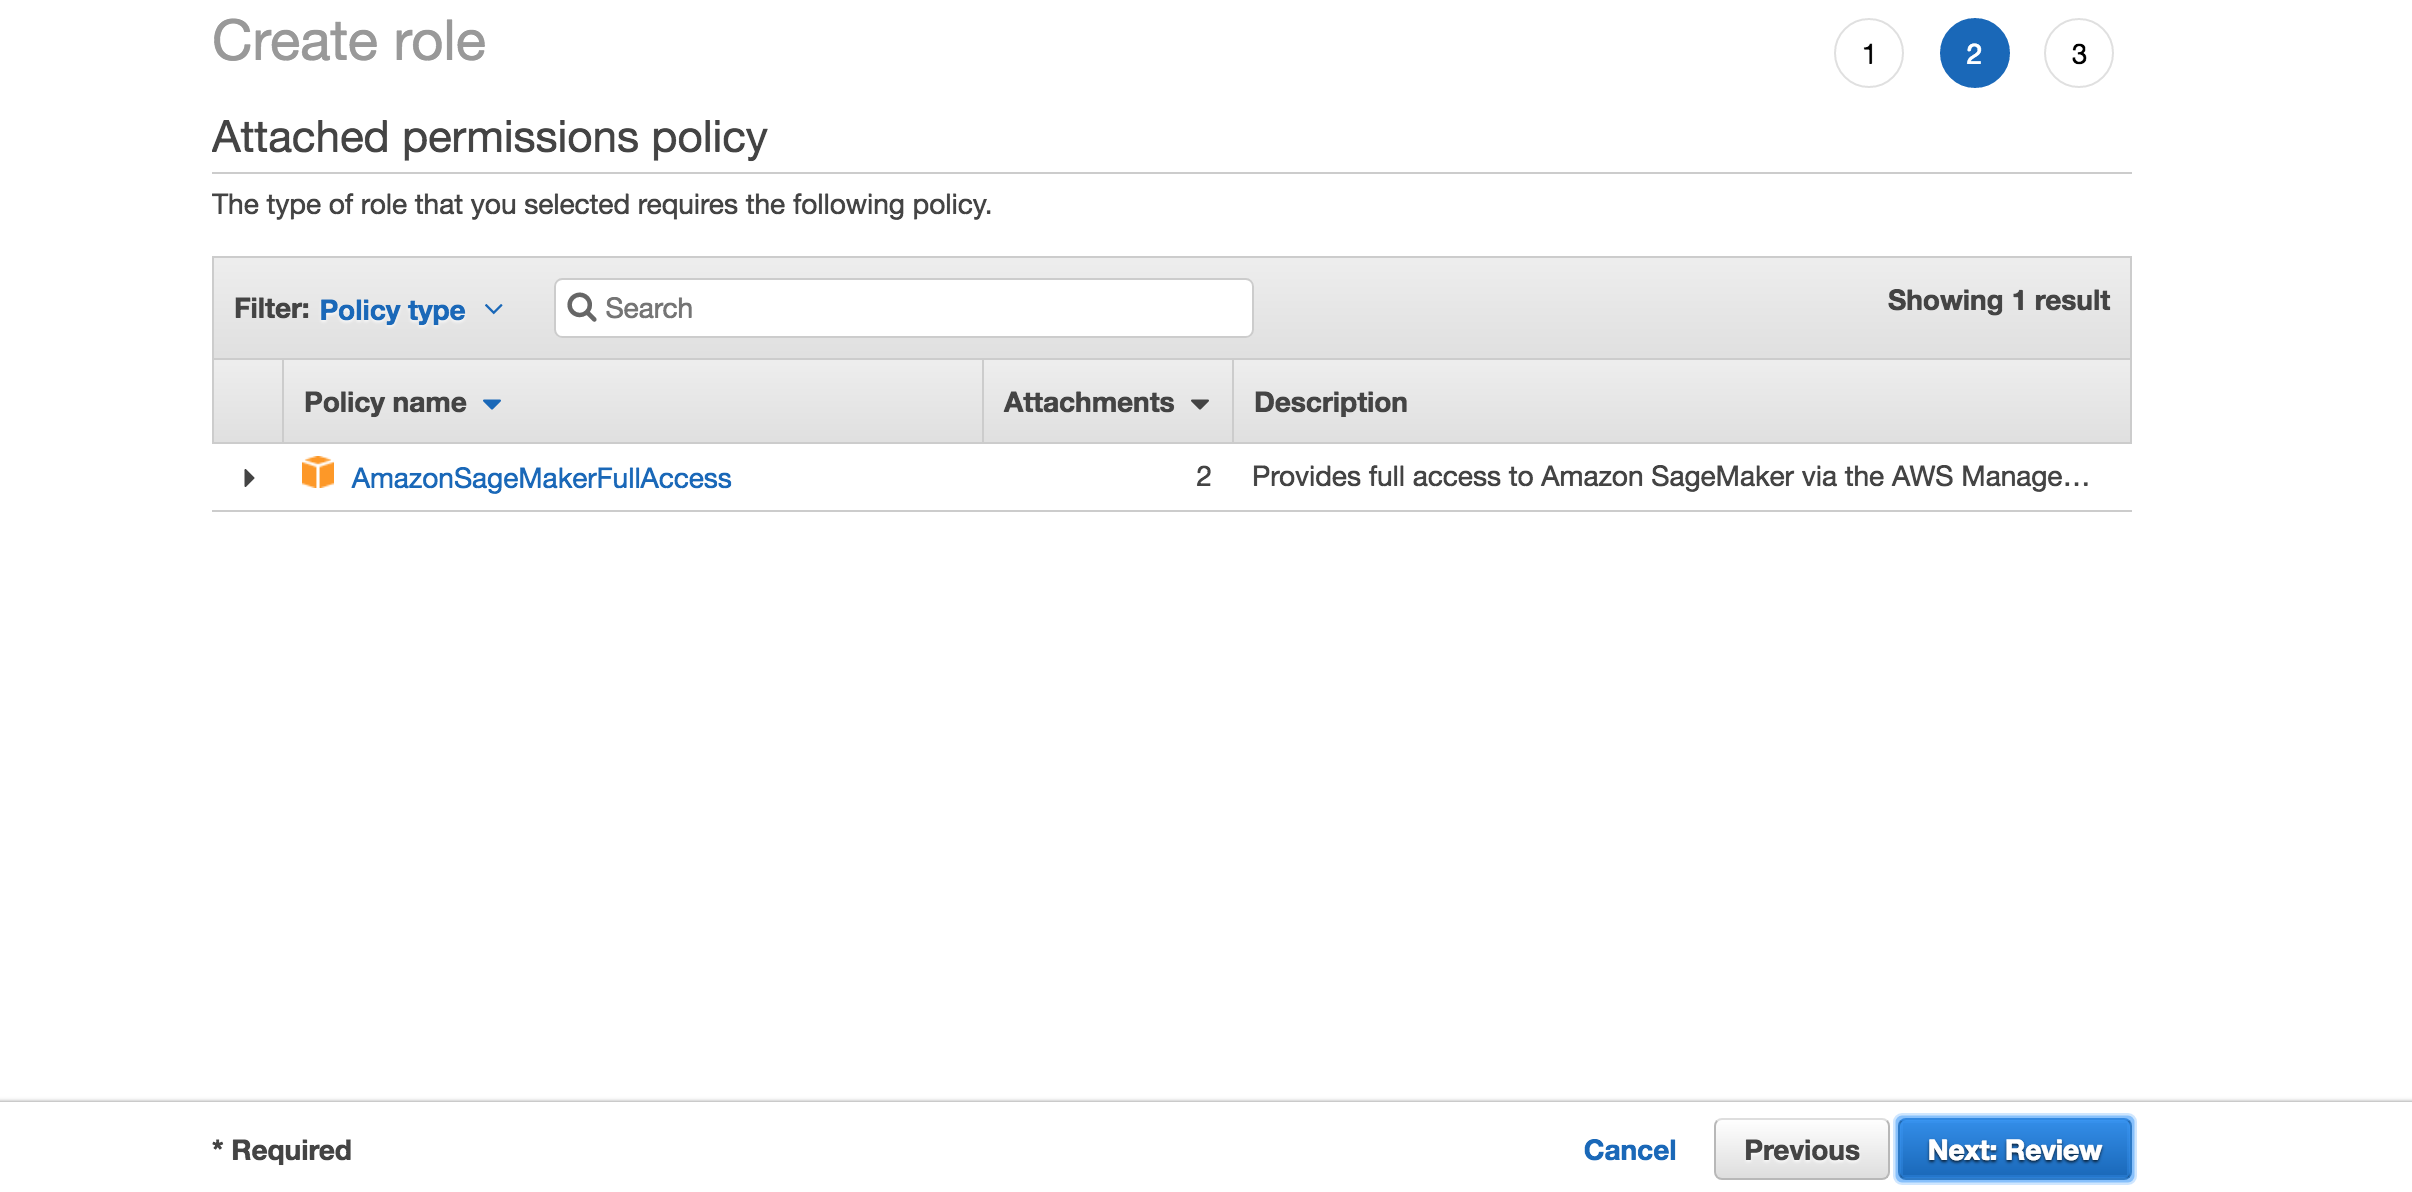
- Type a name for the SageMaker role, and click on Create role:
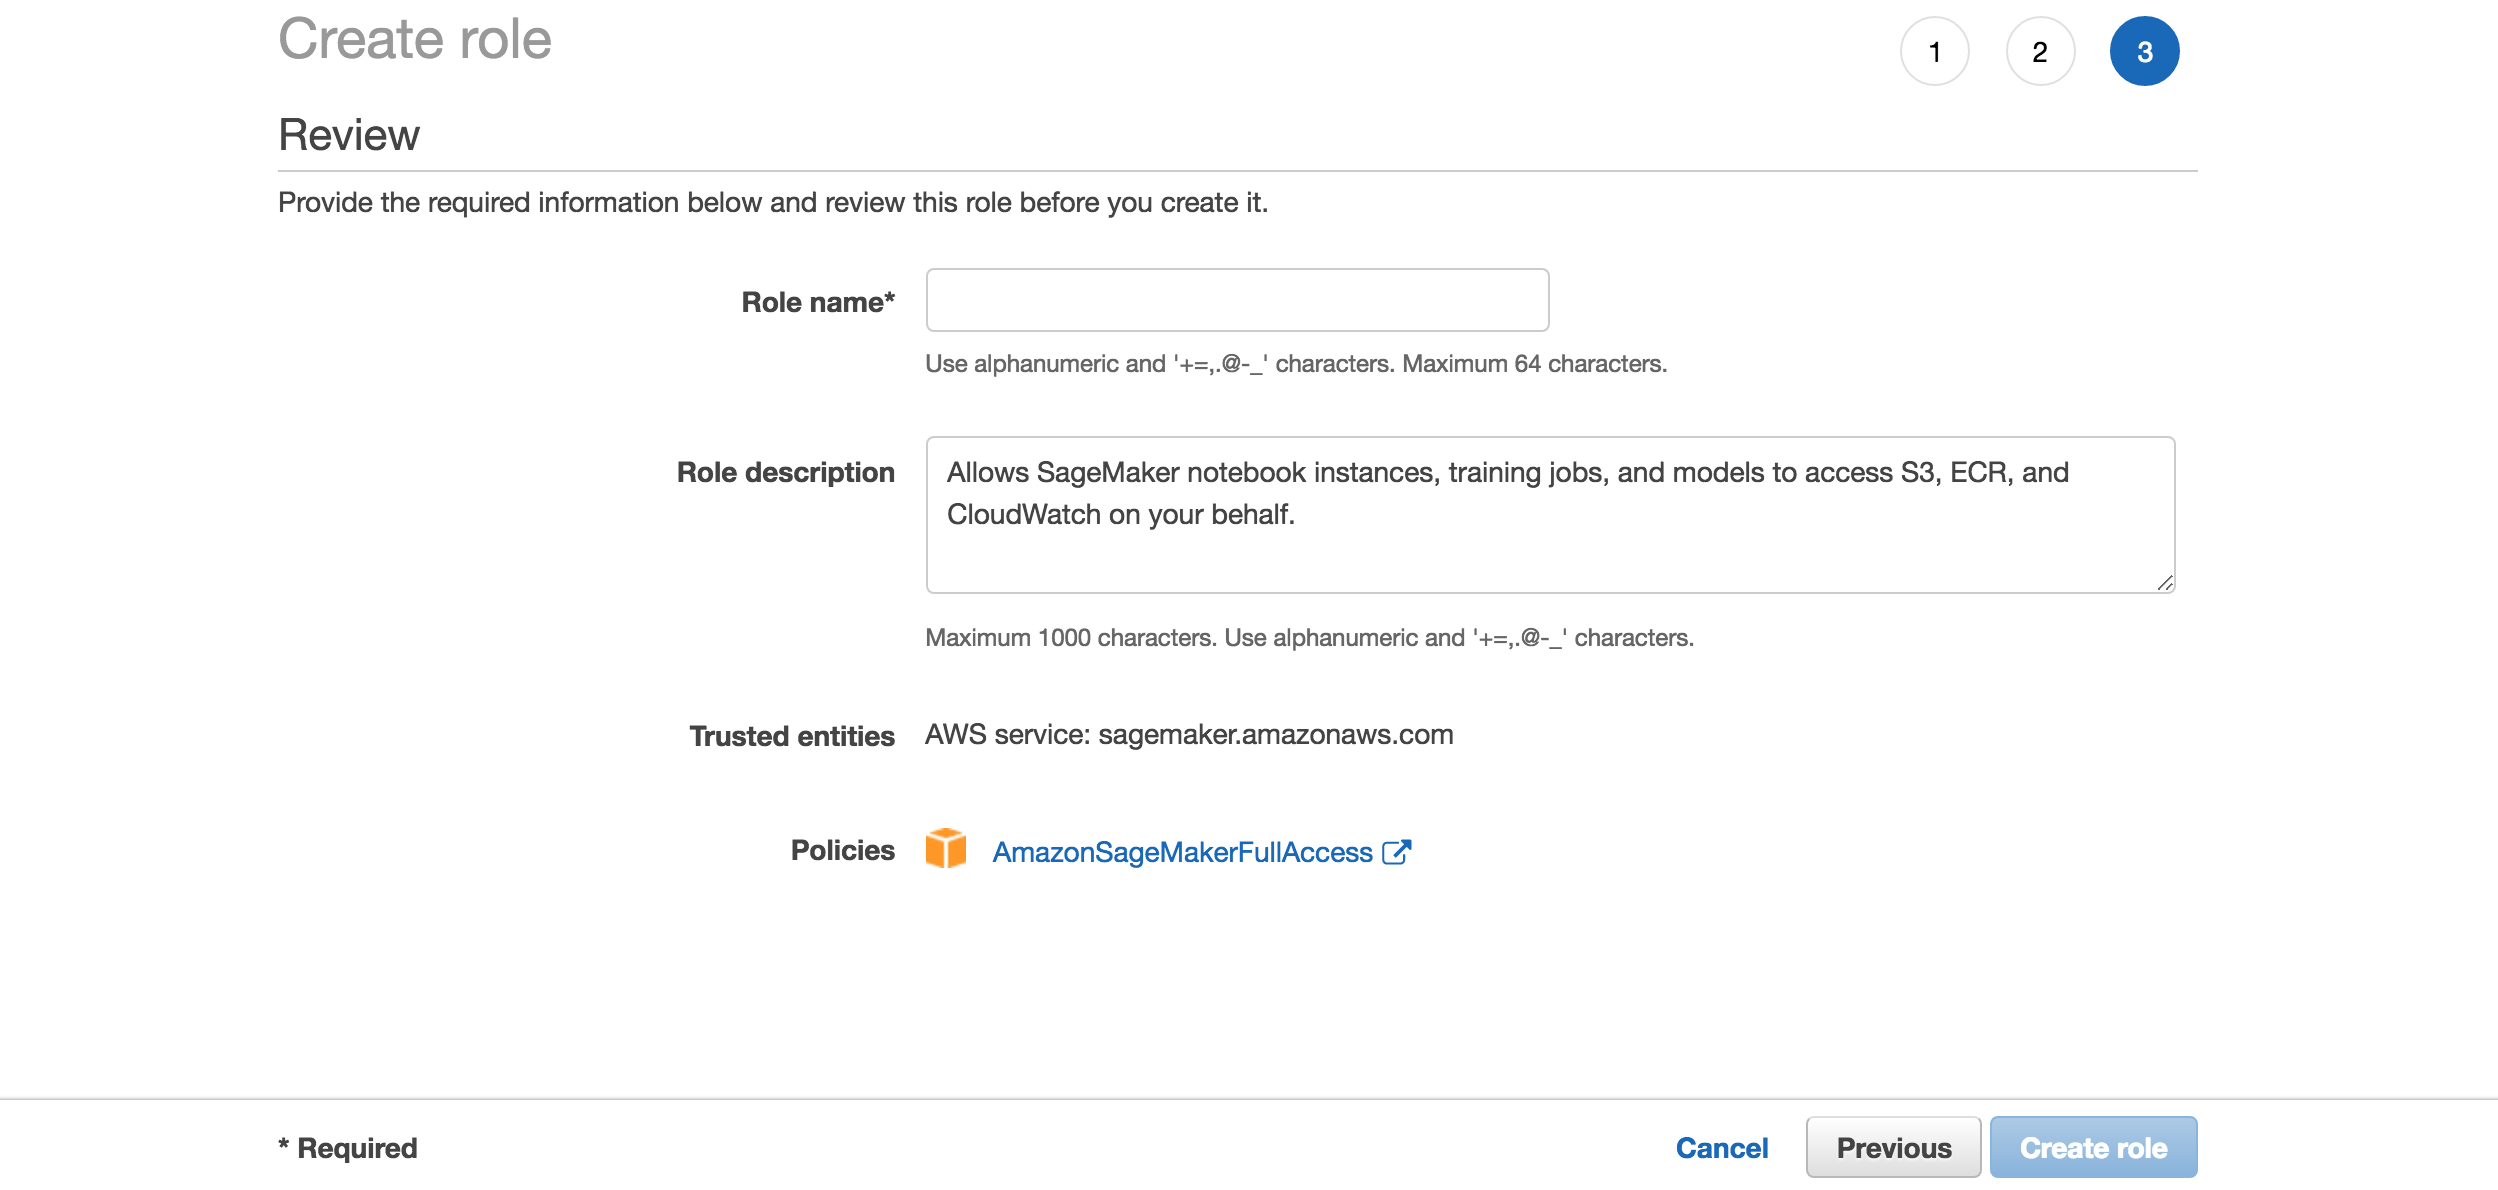
- Click on the created role:
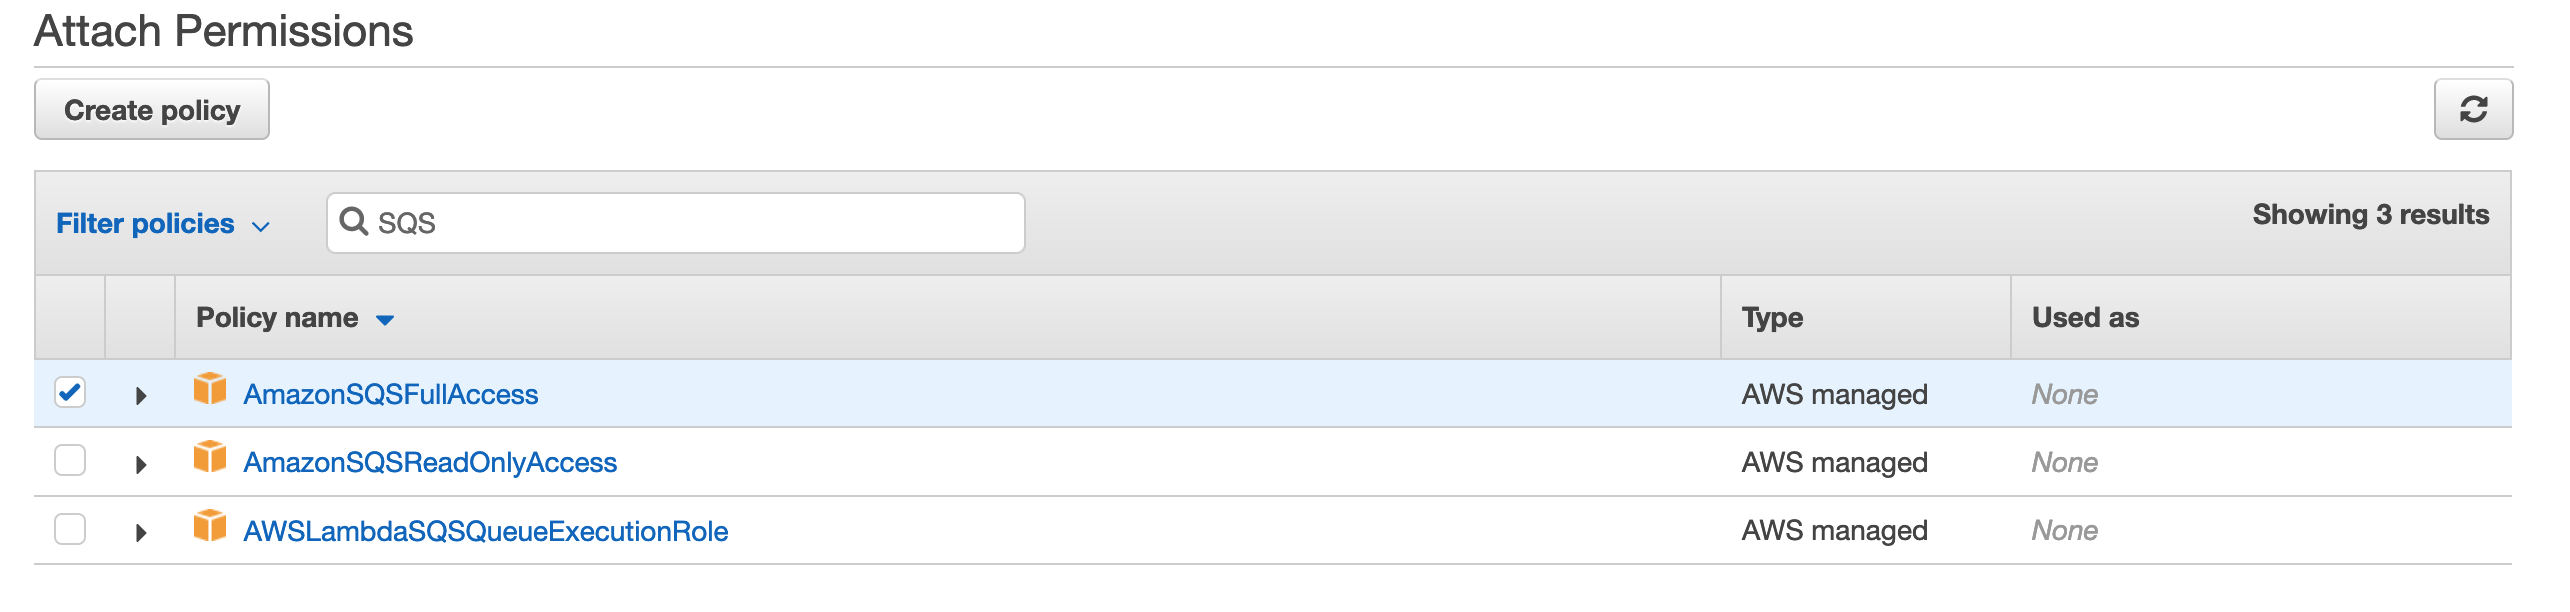
- Click on Attach policy and search for
AmazonEC2ContainerRegistryFullAccess. Attach the corresponding policy:
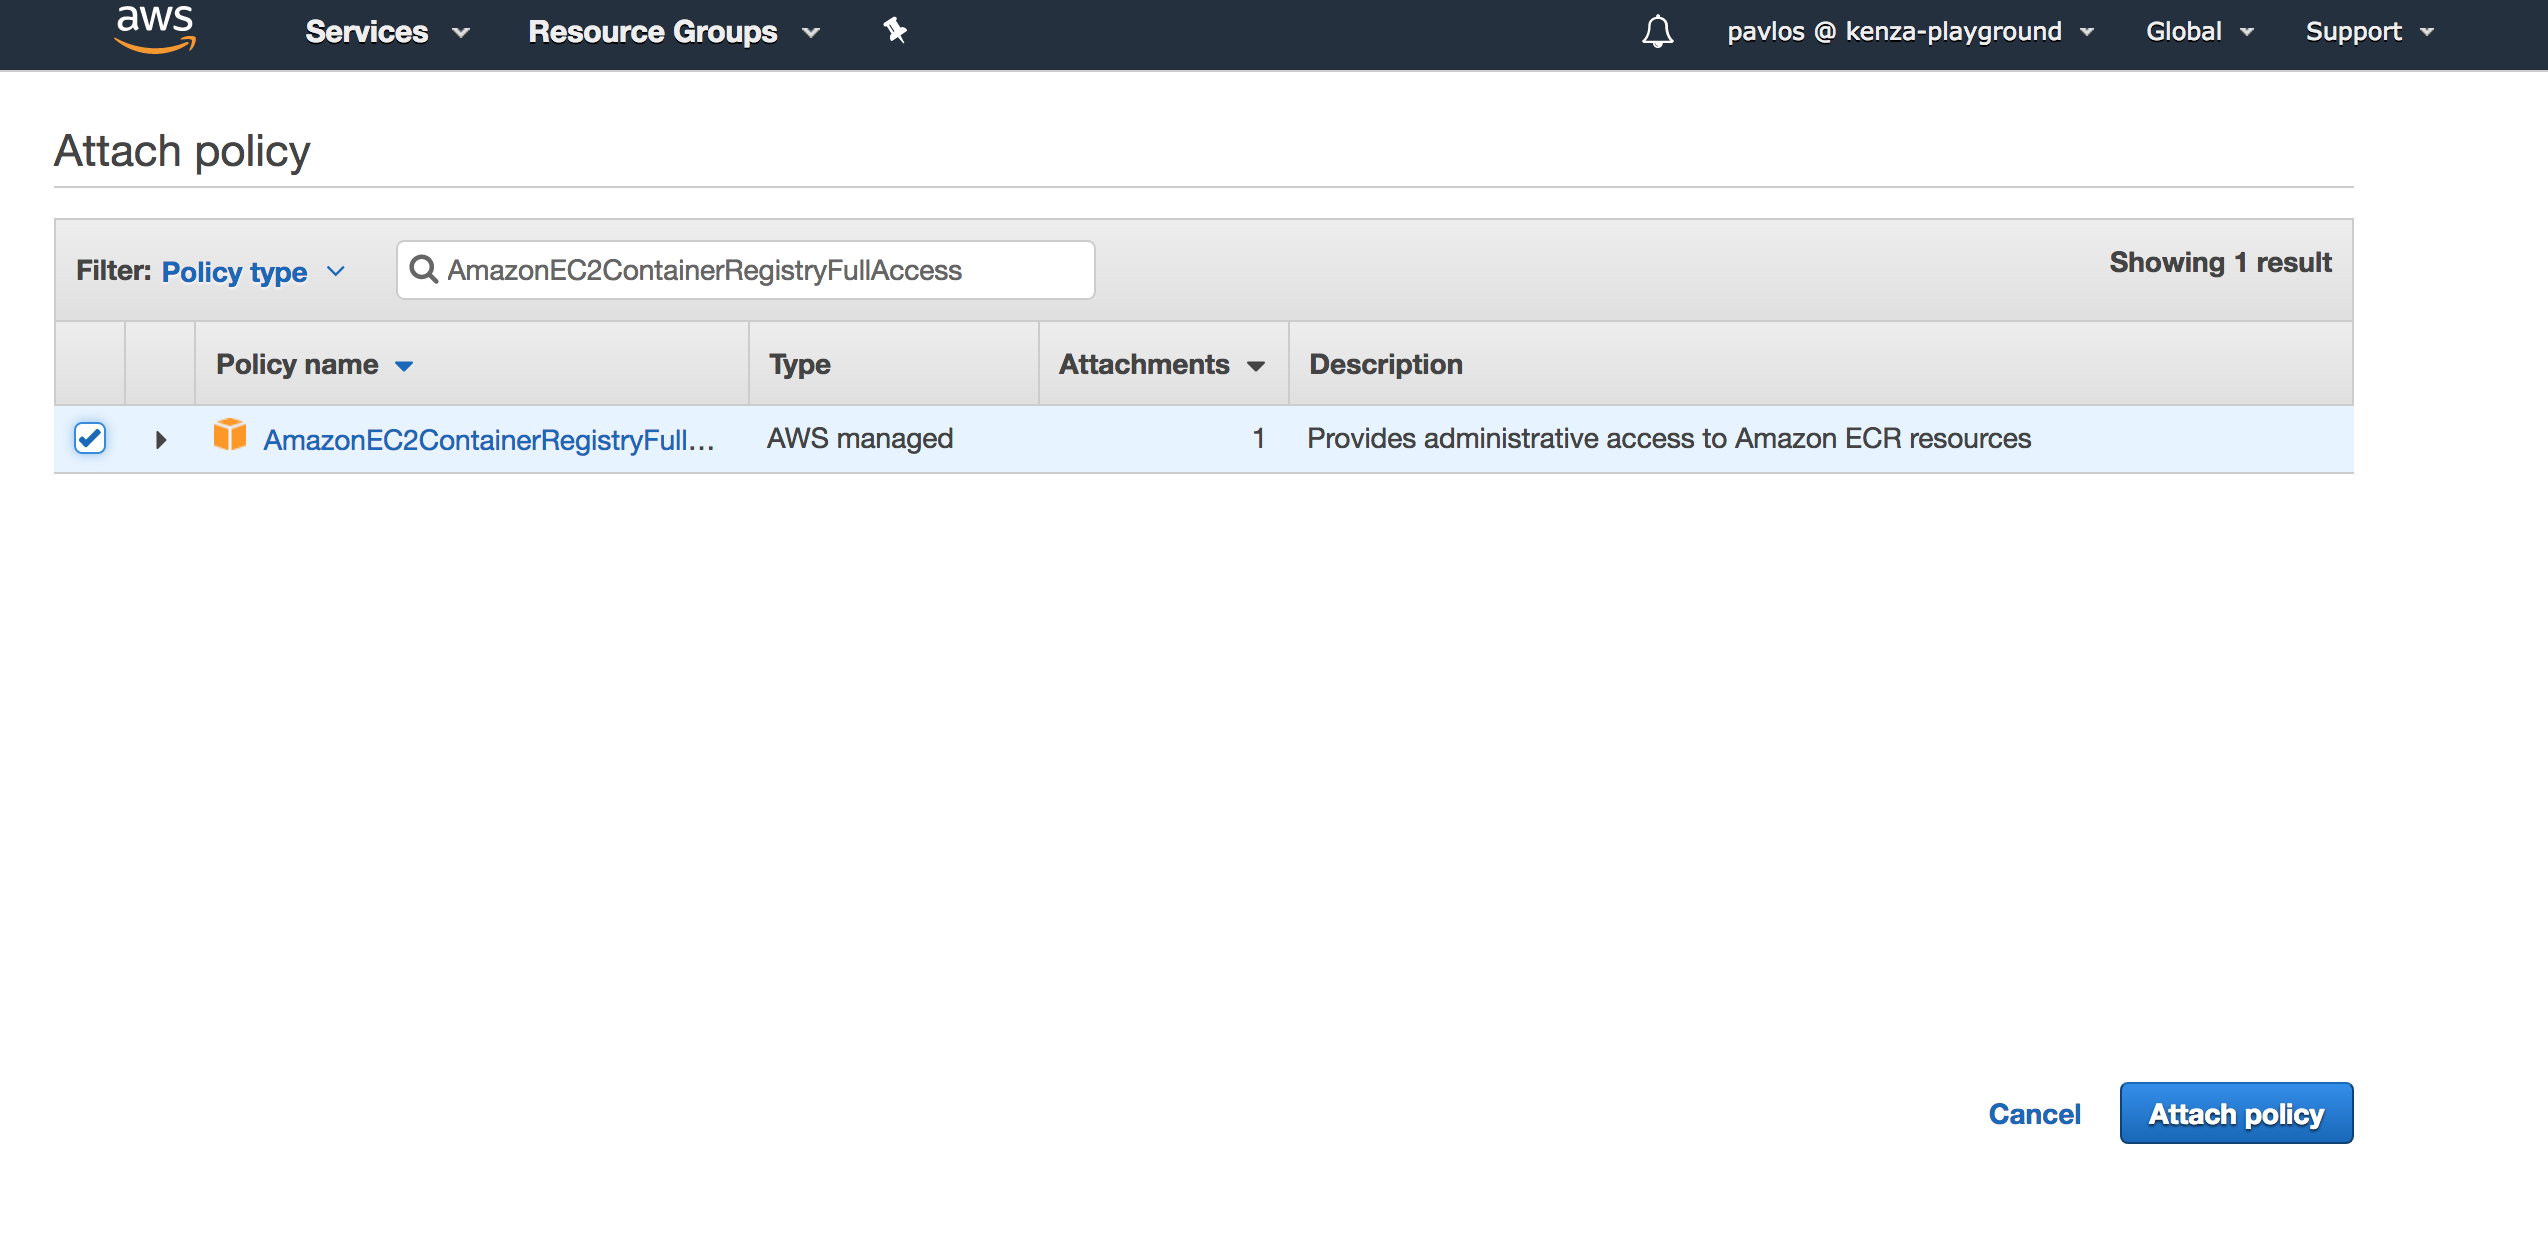
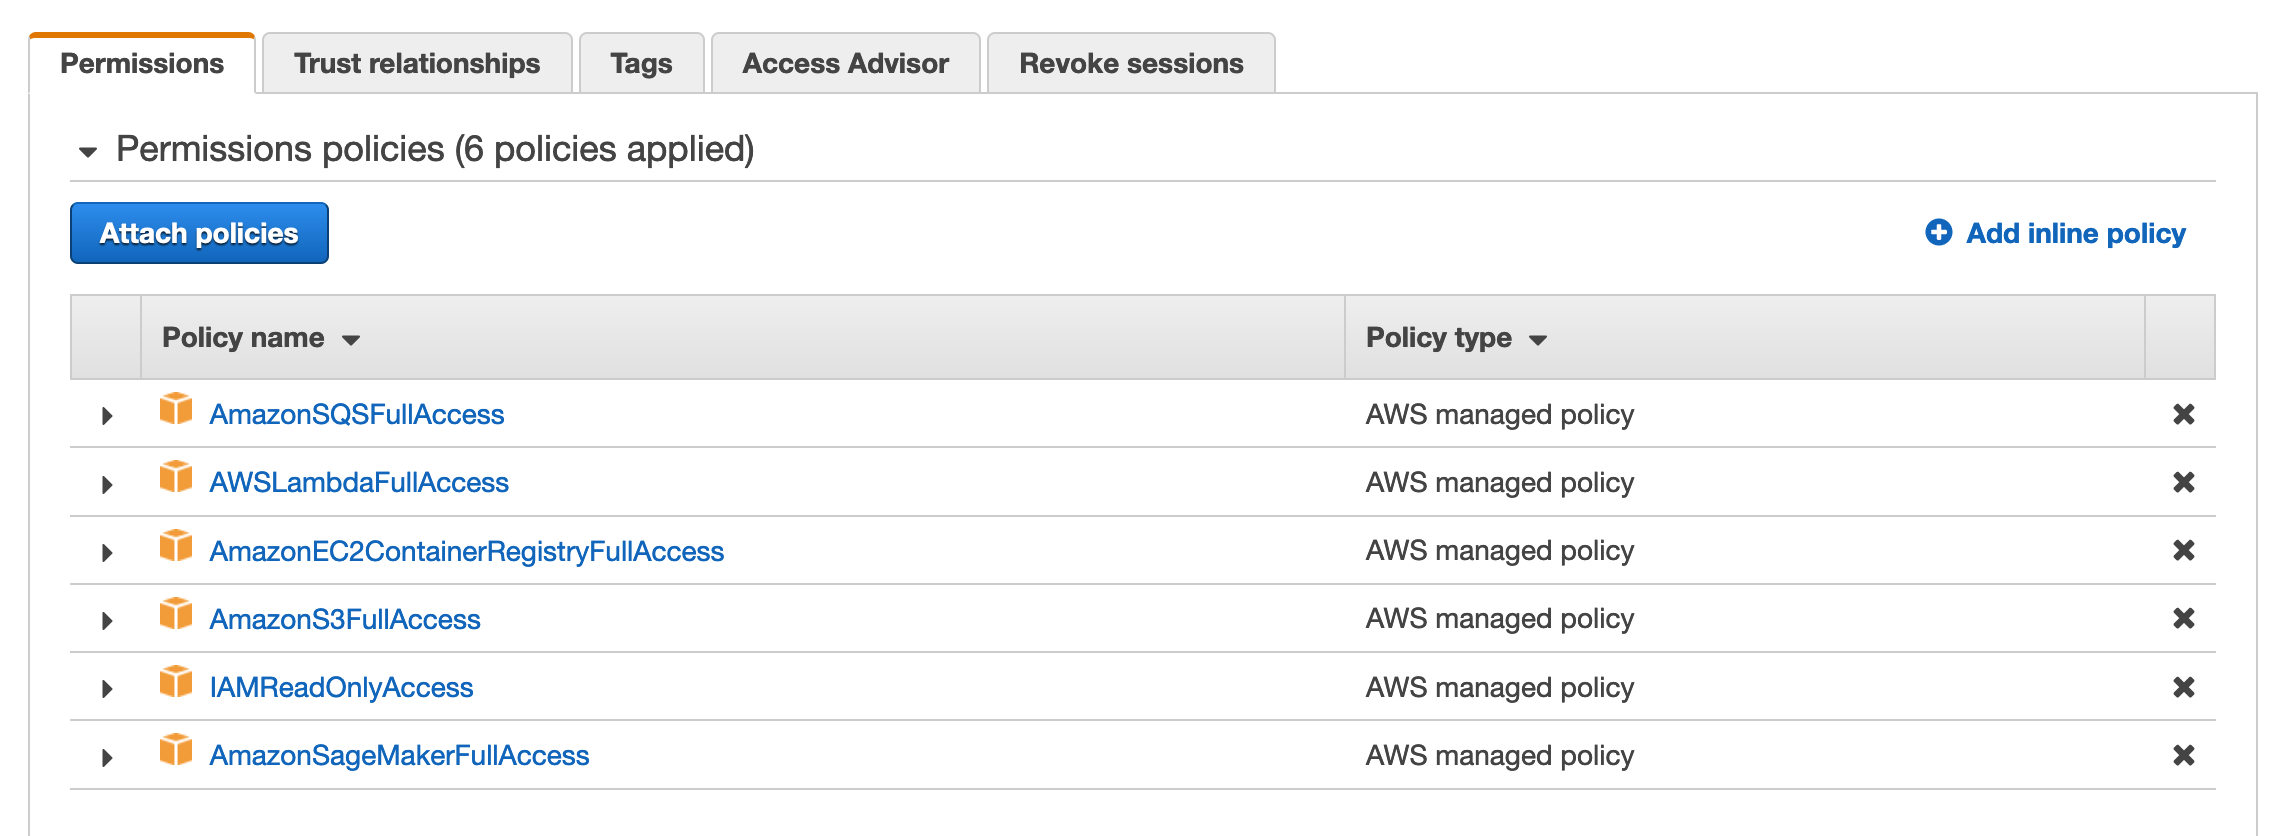
- Do the same to attach the
AmazonS3FullAccess,IAMReadOnlyAccess,AmazonSQSFullAccess,AWSLambdaFullAccess,AmazonEC2ContainerRegistryFullAccessandAmazonSageMakerFullAccesspolicies, and end up with the following:
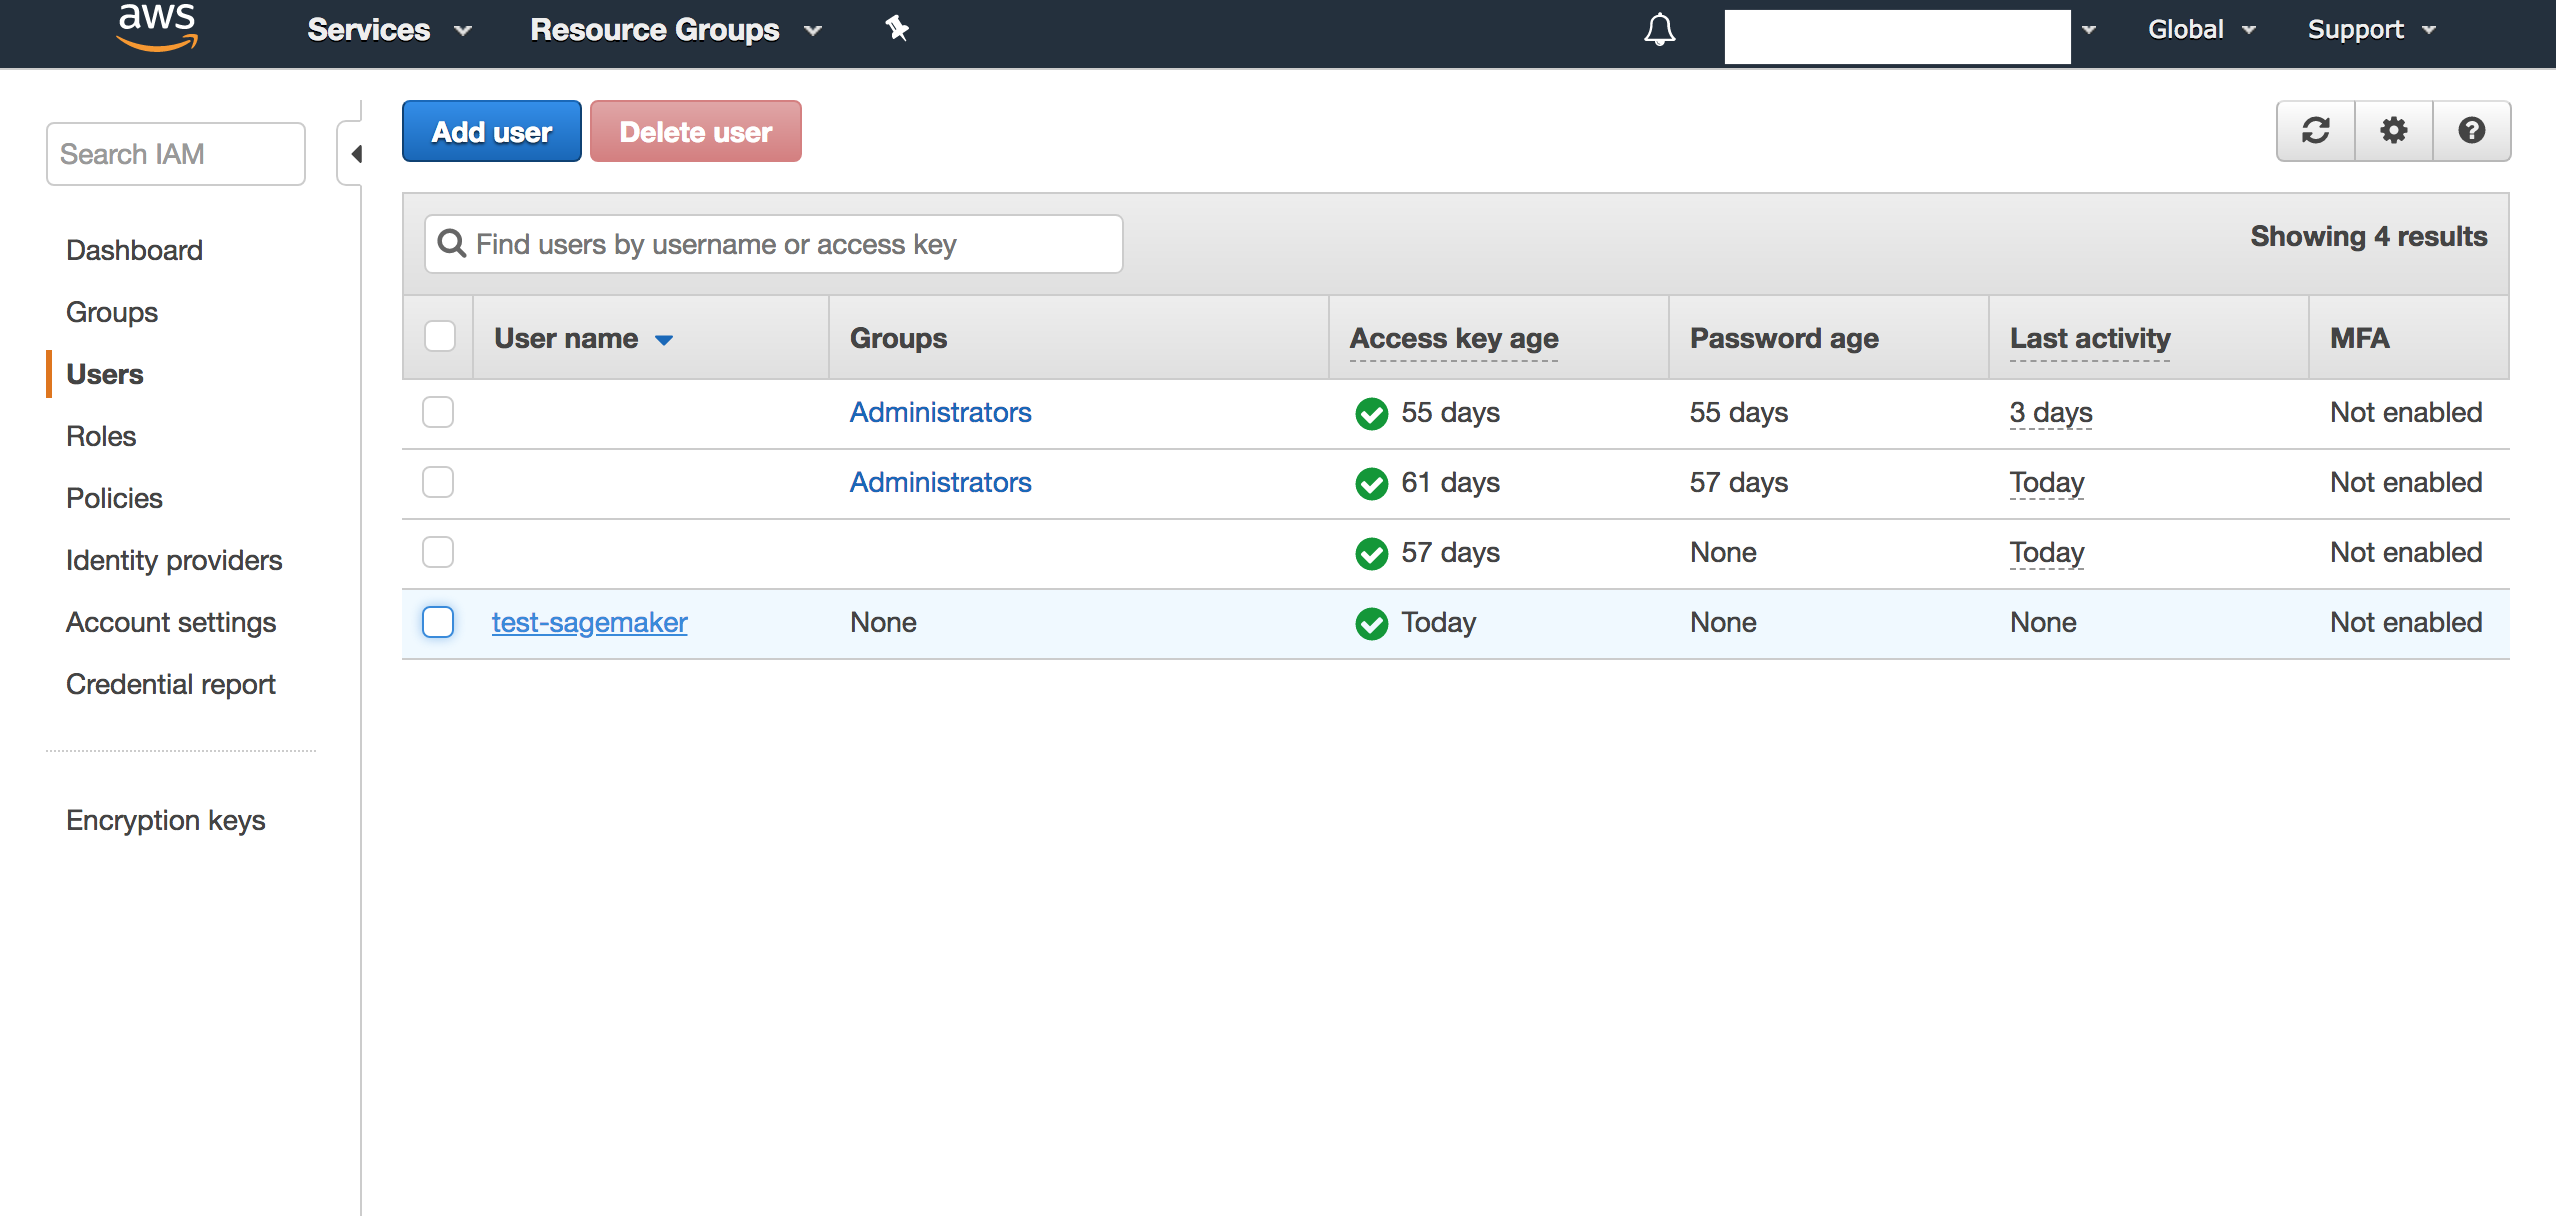
-
Now, go to Users page by clicking on Users on the left-hand side.
-
Click on your IAM user that you want to use for AWS SageMaker and attach the
AmazonSageMakerFullAccesspermission policy:
- Copy the ARN of that user:

- Then, go back the page of the Role you created and click on the Trust relationships tab:
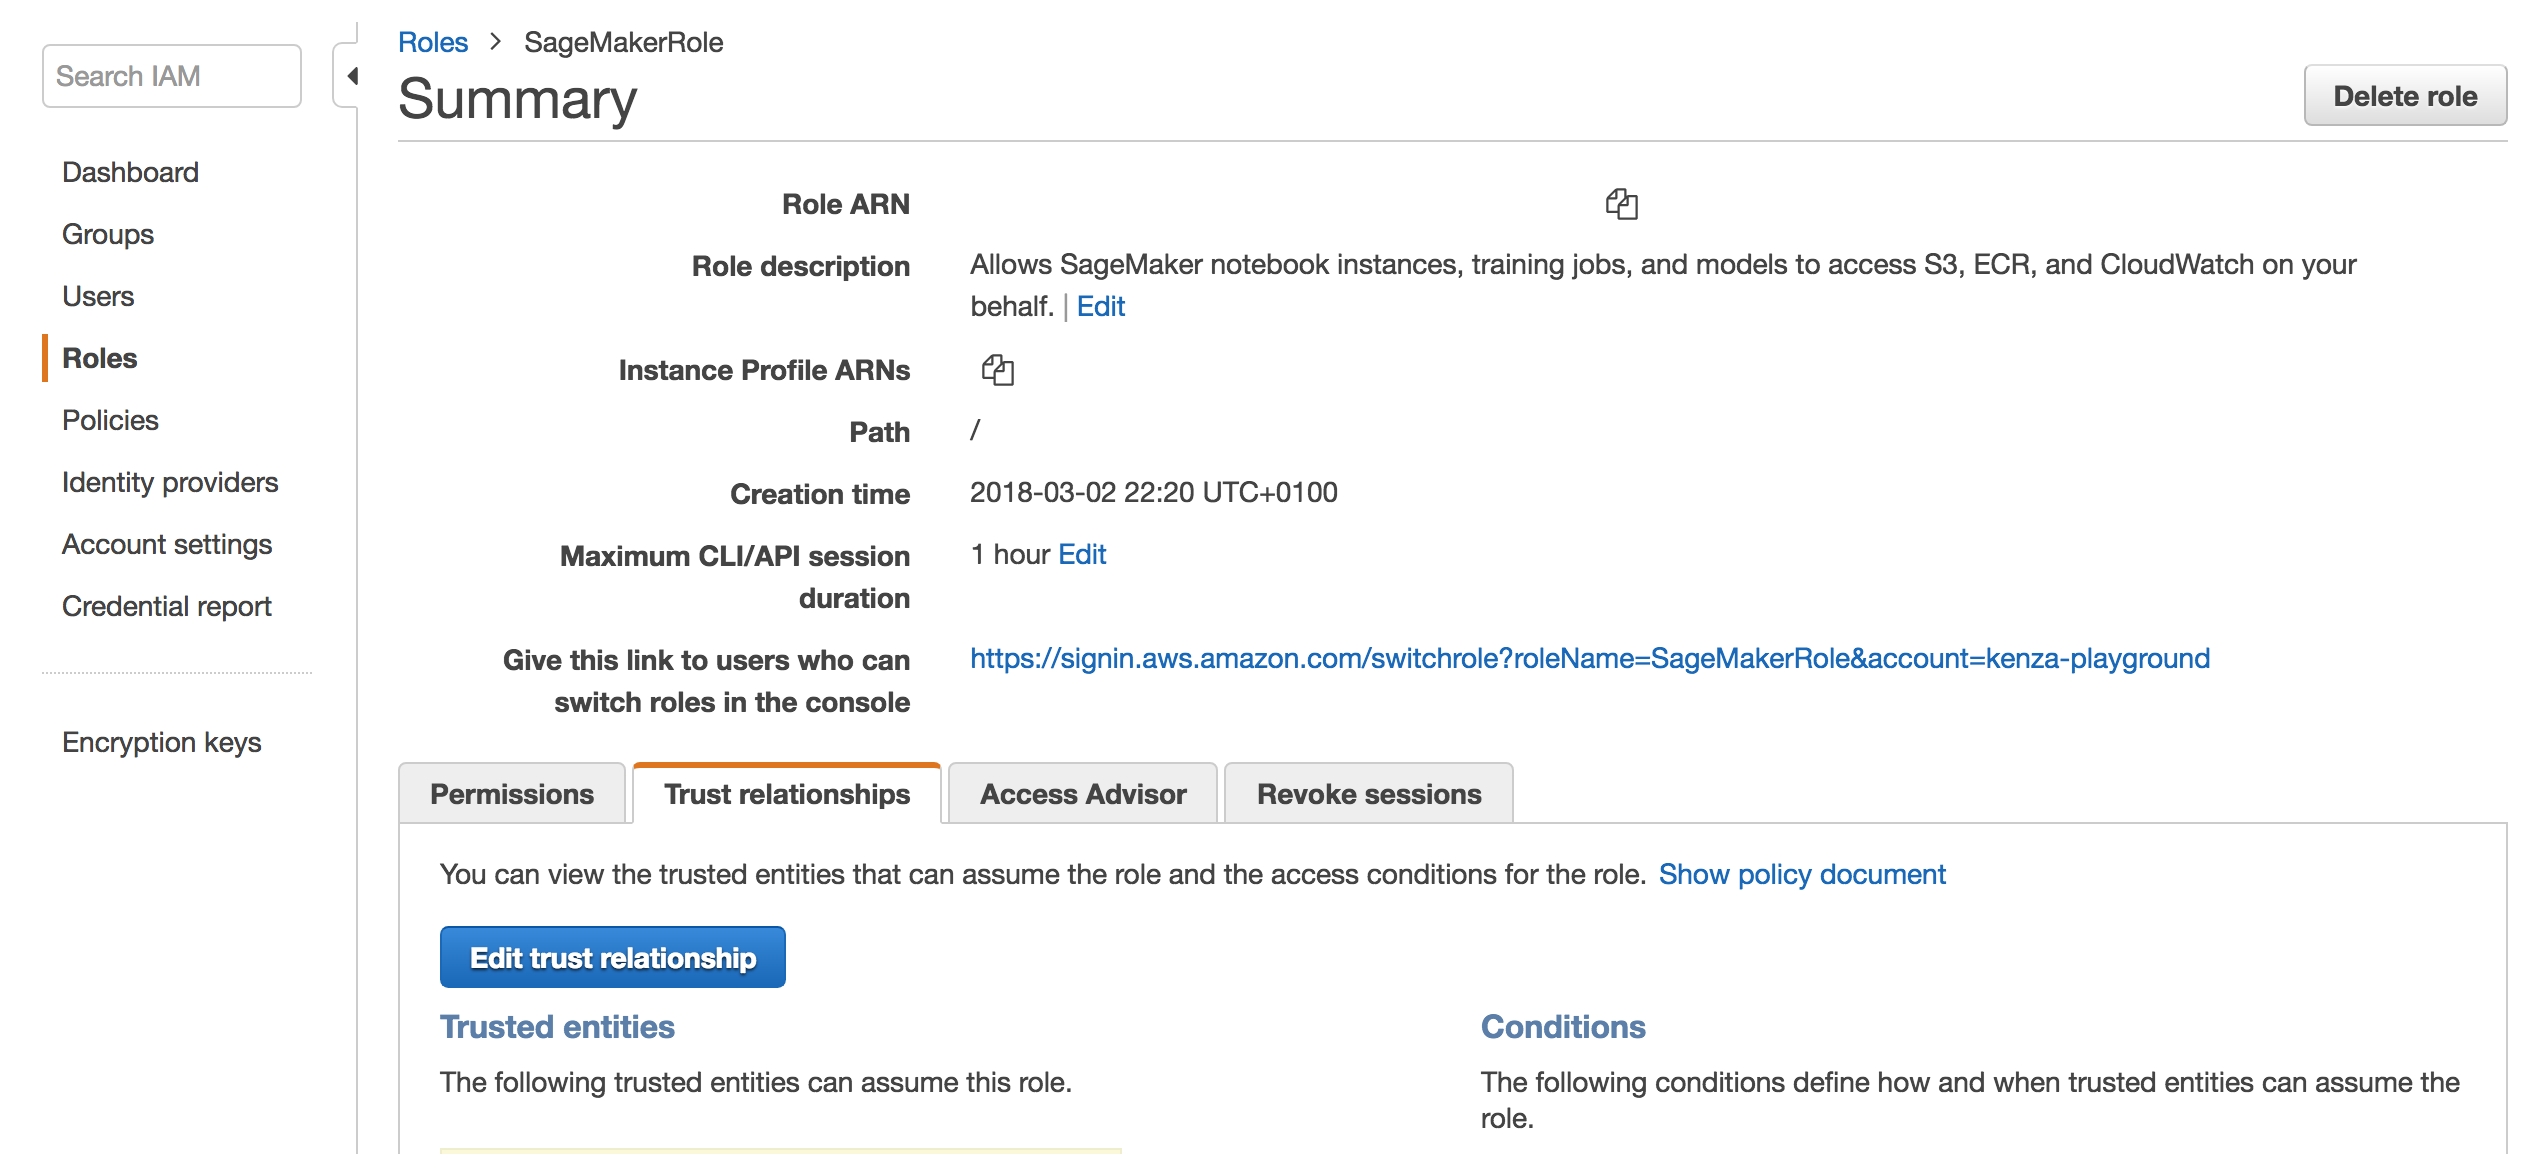
- Click on Edit trust relationship and add the following:
{
    "Version": "2012-10-17",
    "Statement": [
        {
            "Sid": "",
            "Effect": "Allow",
            "Principal": {
                "AWS": "PASTE_THE_ARN_YOU_COPIED_EARLIER",
                "Service": "sagemaker.amazonaws.com"
            },
            "Action": "sts:AssumeRole"
        }
    ]
}
- You're almost there! Make sure that you have added the IAM user in your
~/.aws/credentialsfile. For example:
[test-sagemaker]
aws_access_key_id = ...
aws_secret_access_key = ...
- And, finally, add the following in the
~/.aws/configfile:
[profile test-sagemaker]
region = us-east-1 <-- USE YOUR PREFERRED REGION
role_arn = COPY_PASTE_THE_ARN_OF_THE_CREATED_ROLE_NOT_USER! for example: arn:aws:iam::...:role/TestSageMakerRole
source_profile = test-sagemaker
-
That's it! From now on, choose the created AWS profile when initializing sagify.
-
You can change the AWS profile/region in an already initialized sagify module by changing the value of
aws_profile/aws_regionin.sagify.json.
Commands
Initialize
Name
Initializes a sagify module
Synopsis
sagify init
Description
This command initializes a sagify module in the directory you provide when asked after you invoke the init command.
Example
sagify init
Configure
Description
Updates an existing configuration value e.g. python version or AWS region.
Synopsis
sagify configure [--aws-region AWS_REGION] [--aws-profile AWS_PROFILE] [--image-name IMAGE_NAME] [--python-version PYTHON_VERSION]
Optional Flags
--aws-region AWS_REGION: AWS region where Docker images are pushed and SageMaker operations (train, deploy) are performed.
--aws-profile AWS_PROFILE: AWS profile to use when interacting with AWS.
--image-name IMAGE_NAME: Docker image name used when building for use with SageMaker. This shows up as an AWS ECR repository on your AWS account.
--python-version PYTHON_VERSION: Python version used when building SageMaker's Docker images. Currently supported versions: 3.6.
Example
sagify configure --aws-region us-east-2 --aws-profile default --image-name sage-docker-image-name --python-version 3.6
Build
Name
Builds a Docker image
Synopsis
sagify build
Description
This command builds a Docker image from code under the directory sagify is installed in. A REQUIREMENTS_FILE needs to be specified during sagify init or later via sagify configure --requirements-dir for all required dependencies to be installed in the Docker image.
Example
sagify build
Local Train
Name
Executes a Docker image in train mode
Synopsis
sagify local train
Description
This command executes a Docker image in train mode. More specifically, it executes the train(...) function in sagify_base/training/training.py inside an already built Docker image (see Build command section).
Example
sagify local train
Local Deploy
Name
Executes a Docker image in serve mode
Synopsis
sagify local deploy
Description
This command executes a Docker image in serve mode. More specifically, it runs a Flask REST app in Docker image and directs HTTP requests to /invocations endpoint. Then, the /invocations endpoint calls the predict(...) function in sagify_base/prediction/prediction.py (see Build command section on how to build a Docker image).
Example
sagify local deploy
Push
Name
Pushes a Docker image to AWS Elastic Container Service
Synopsis
sagify push [--aws-profile PROFILE_NAME] [--aws-region AWS_REGION] [--iam-role-arn IAM_ROLE] [--external-id EXTERNAL_ID]
Description
This command pushes an already built Docker image to AWS Elastic Container Service. Later on, AWS SageMaker will consume that image from AWS Elastic Container Service for train and serve mode.
Only one of iam-role-arn and aws_profile can be provided. external-id is ignored when no iam-role-arn is provided.
Optional Flags
--iam-role-arn IAM_ROLE or -i IAM_ROLE: AWS IAM role to use for pushing to ECR
--aws-region AWS_REGION or -r AWS_REGION: The AWS region to push the image to
--aws-profile PROFILE_NAME or -p PROFILE_NAME: AWS profile to use for pushing to ECR
--external-id EXTERNAL_ID or -e EXTERNAL_ID: Optional external id used when using an IAM role
Example
sagify push
Cloud Upload Data
Name
Uploads data to AWS S3
Synopsis
sagify cloud upload-data --input-dir LOCAL_INPUT_DATA_DIR --s3-dir S3_TARGET_DATA_LOCATION
Description
This command uploads content under LOCAL_INPUT_DATA_DIR to S3 under S3_TARGET_DATA_LOCATION
Required Flags
--input-dir LOCAL_INPUT_DATA_DIR or -i LOCAL_INPUT_DATA_DIR: Local input directory
--s3-dir S3_TARGET_DATA_LOCATION or -s S3_TARGET_DATA_LOCATION: S3 target location
Example
sagify cloud upload-data -i ./training_data/ -s s3://my-bucket/training-data/
Cloud Train
Name
Trains your ML/DL model using a Docker image on AWS SageMaker with input from S3
Synopsis
sagify cloud train --input-s3-dir INPUT_DATA_S3_LOCATION --output-s3-dir S3_LOCATION_TO_SAVE_OUTPUT --ec2-type EC2_TYPE [--hyperparams-file HYPERPARAMS_JSON_FILE] [--volume-size EBS_SIZE_IN_GB] [--time-out TIME_OUT_IN_SECS] [--aws-tags TAGS] [--iam-role-arn IAM_ROLE] [--external-id EXTERNAL_ID] [--base-job-name BASE_JOB_NAME] [--job-name JOB_NAME] [--metric-names COMMA_SEPARATED_METRIC_NAMES] [--use-spot-instances FLAG_TO_USE_SPOT_INSTANCES]
Description
This command retrieves a Docker image from AWS Elastic Container Service and executes it on AWS SageMaker in train mode
Required Flags
--input-s3-dir INPUT_DATA_S3_LOCATION or -i INPUT_DATA_S3_LOCATION: S3 location to input data
--output-s3-dir S3_LOCATION_TO_SAVE_OUTPUT or -o S3_LOCATION_TO_SAVE_OUTPUT: S3 location to save output (models, reports, etc). Make sure that the output bucket already exists. Any not existing key prefix will be created by sagify.
--ec2-type EC2_TYPE or -e EC2_TYPE: ec2 type. Refer to https://aws.amazon.com/sagemaker/pricing/instance-types/
Optional Flags
--hyperparams-file HYPERPARAMS_JSON_FILE or -h HYPERPARAMS_JSON_FILE: Path to hyperparams JSON file
--volume-size EBS_SIZE_IN_GB or -v EBS_SIZE_IN_GB: Size in GB of the EBS volume (default: 30)
--time-out TIME_OUT_IN_SECS or -s TIME_OUT_IN_SECS: Time-out in seconds (default: 24 * 60 * 60)
--aws-tags TAGS or -a TAGS: Tags for labeling a training job of the form tag1=value1;tag2=value2. For more, see https://docs.aws.amazon.com/sagemaker/latest/dg/API_Tag.html.
--iam-role-arn IAM_ROLE or -r IAM_ROLE: AWS IAM role to use for training with SageMaker
--external-id EXTERNAL_ID or -x EXTERNAL_ID: Optional external id used when using an IAM role
--base-job-name BASE_JOB_NAME or -n BASE_JOB_NAME: Optional prefix for the SageMaker training job
--job-name JOB_NAME: Optional name for the SageMaker training job. NOTE: if a --base-job-name is passed along with this option, it will be ignored.
--use-spot-instances FLAG_TO_USE_SPOT_INSTANCES: Optional flag that specifies whether to use SageMaker Managed Spot instances for training. It should be used only for training jobs that take less than 1 hour. More information: https://docs.aws.amazon.com/sagemaker/latest/dg/model-managed-spot-training.html (default: False).
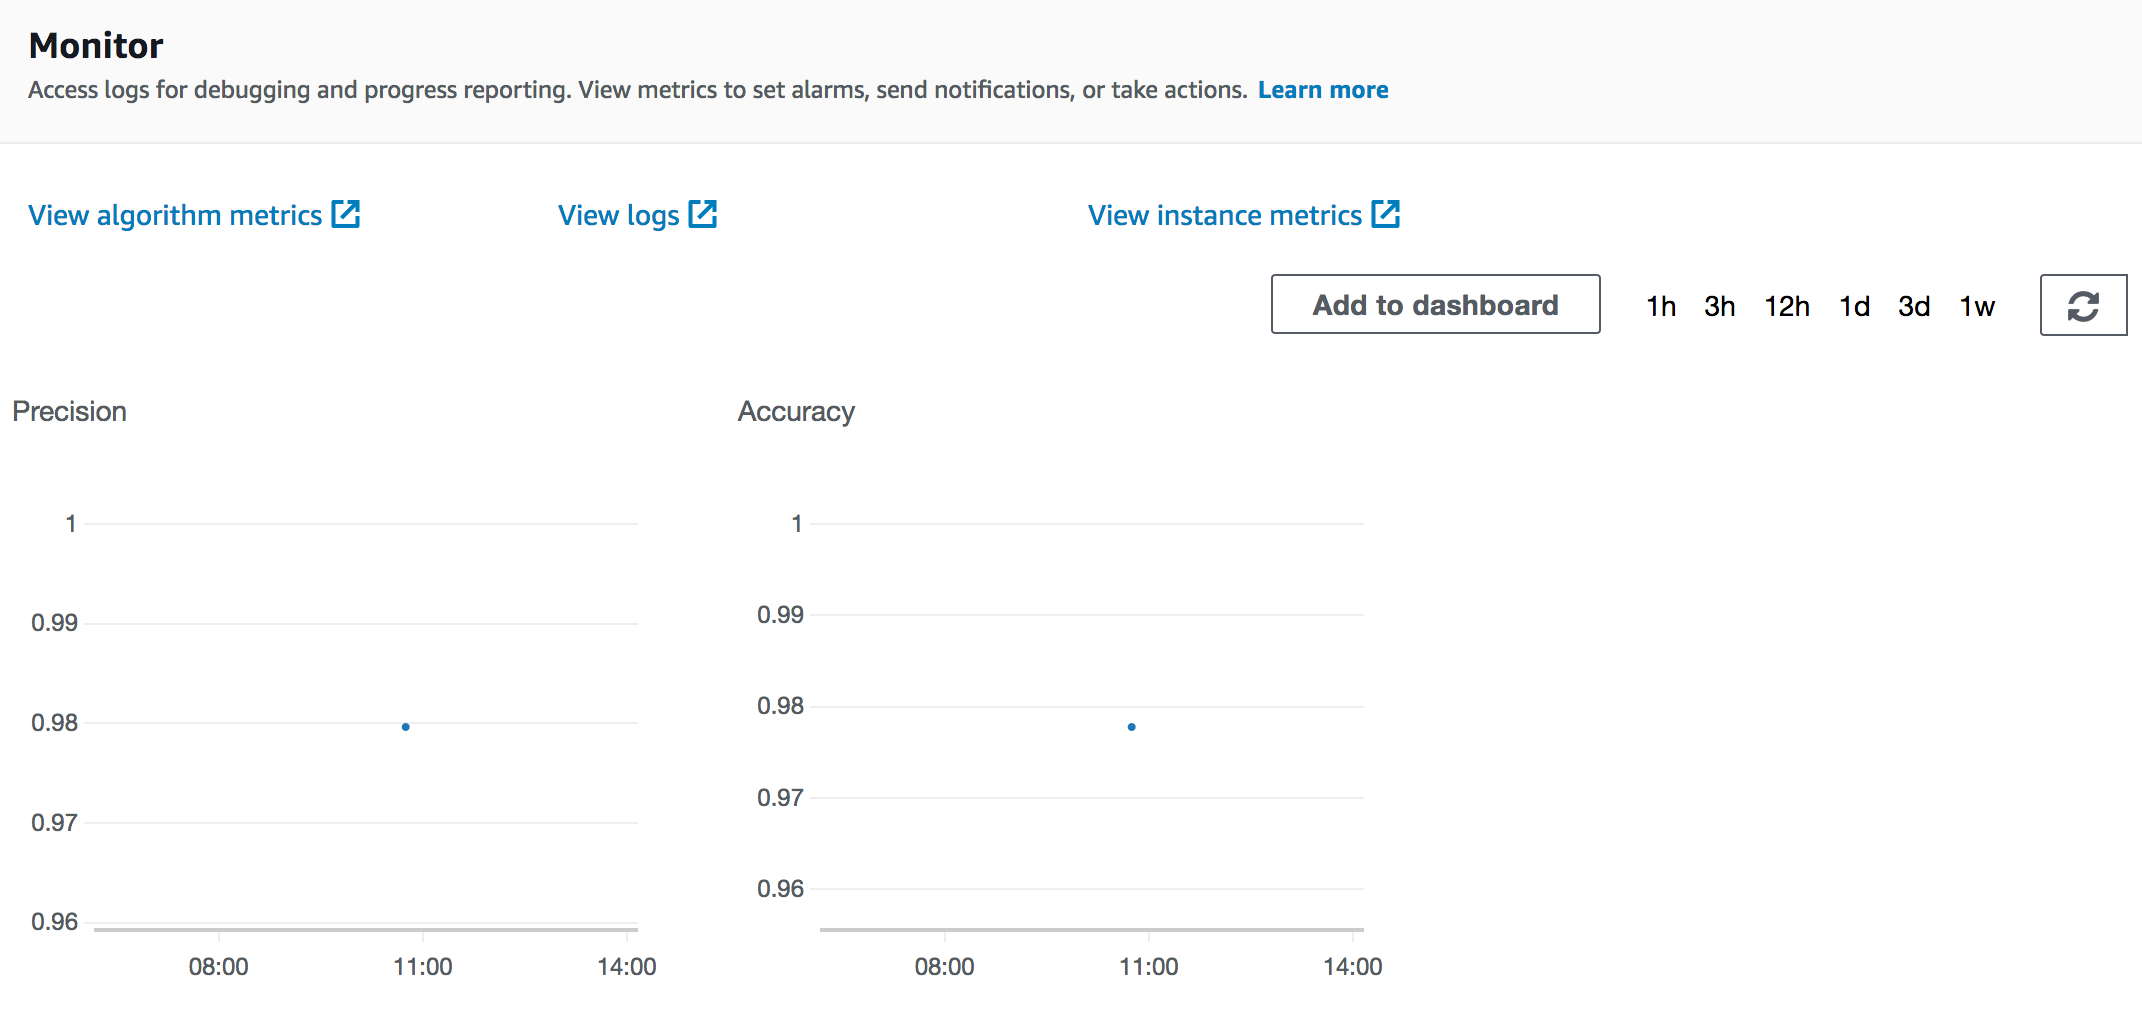
--metric-names COMMA_SEPARATED_METRIC_NAMES: Optional comma-separated metric names for tracking performance of training jobs. Example: Precision,Recall,AUC. Then, make sure you log these metric values using the log_metric function in the train function:
...
from sagify.api.hyperparameter_tuning import log_metric
log_metric("Precision:, precision)
log_metric("Accuracy", accuracy)
...
When the training jobs finishes, they will be stored in the CloudWatch algorithm metrics logs of the SageMaker training job:
Example
sagify cloud train -i s3://my-bucket/training-data/ -o s3://my-bucket/output/ -e ml.m4.xlarge -h local/path/to/hyperparams.json -v 60 -t 86400 --metric-names Accuracy,Precision
Cloud Hyperparameter Optimization
Name
Executes a Docker image in hyperparameter-optimization mode on AWS SageMaker
Synopsis
sagify cloud hyperparameter-optimization --input-s3-dir INPUT_DATA_S3_LOCATION --output-s3-dir S3_LOCATION_TO_SAVE_MULTIPLE_TRAINED_MODELS --ec2-type EC2_TYPE [--hyperparams-config-file HYPERPARAM_RANGES_JSON_FILE] [--max-jobs MAX_NUMBER_OF_TRAINING_JOBS] [--max-parallel-jobs MAX_NUMBER_OF_PARALLEL_TRAINING_JOBS] [--volume-size EBS_SIZE_IN_GB] [--time-out TIME_OUT_IN_SECS] [--aws-tags TAGS] [--iam-role-arn IAM_ROLE] [--external-id EXTERNAL_ID] [--base-job-name BASE_JOB_NAME] [--job-name JOB_NAME] [--wait WAIT_UNTIL_HYPERPARAM_JOB_IS_FINISHED] [--use-spot-instances FLAG_TO_USE_SPOT_INSTANCES]
Description
This command retrieves a Docker image from AWS Elastic Container Service and executes it on AWS SageMaker in hyperparameter-optimization mode
Required Flags
--input-s3-dir INPUT_DATA_S3_LOCATION or -i INPUT_DATA_S3_LOCATION: S3 location to input data
--output-s3-dir S3_LOCATION_TO_SAVE_OUTPUT or -o S3_LOCATION_TO_SAVE_OUTPUT: S3 location to save output (models, reports, etc). Make sure that the output bucket already exists. Any not existing key prefix will be created by sagify.
--ec2-type EC2_TYPE or -e EC2_TYPE: ec2 type. Refer to https://aws.amazon.com/sagemaker/pricing/instance-types/
--hyperparams-config-file HYPERPARAM_RANGES_JSON_FILE or -h HYPERPARAM_RANGES_JSON_FILE: Local path to hyperparameters configuration file. Example:
{
    "ParameterRanges": {
        "CategoricalParameterRanges": [
            {
                "Name": "kernel",
                "Values": ["linear", "rbf"]
            }
        ],
        "ContinuousParameterRanges": [
        {
          "MinValue": 0.001,
          "MaxValue": 10,
          "Name": "gamma"
        }
        ],
        "IntegerParameterRanges": [
            {
                "Name": "C",
                "MinValue": 1,
                "MaxValue": 10
            }
        ]
    },
    "ObjectiveMetric": {
        "Name": "Precision",
        "Type": "Maximize"
    }
}
Optional Flags
--max-jobs MAX_NUMBER_OF_TRAINING_JOBS or -m MAX_NUMBER_OF_TRAINING_JOBS: Maximum total number of training jobs to start for the hyperparameter tuning job (default: 3)
--max-parallel-jobs MAX_NUMBER_OF_PARALLEL_TRAINING_JOBS or -p MAX_NUMBER_OF_PARALLEL_TRAINING_JOBS: Maximum number of parallel training jobs to start (default: 1)
--volume-size EBS_SIZE_IN_GB or -v EBS_SIZE_IN_GB: Size in GB of the EBS volume (default: 30)
--time-out TIME_OUT_IN_SECS or -s TIME_OUT_IN_SECS: Time-out in seconds (default: 24 * 60 * 60)
--aws-tags TAGS or -a TAGS: Tags for labeling a training job of the form tag1=value1;tag2=value2. For more, see https://docs.aws.amazon.com/sagemaker/latest/dg/API_Tag.html.
--iam-role-arn IAM_ROLE or -r IAM_ROLE: AWS IAM role to use for training with SageMaker
--external-id EXTERNAL_ID or -x EXTERNAL_ID: Optional external id used when using an IAM role
--base-job-name BASE_JOB_NAME or -n BASE_JOB_NAME: Optional prefix for the SageMaker training job
--job-name JOB_NAME: Optional name for the SageMaker training job. NOTE: if a --base-job-name is passed along with this option, it will be ignored.
--wait WAIT_UNTIL_HYPERPARAM_JOB_IS_FINISHED or -w WAIT_UNTIL_HYPERPARAM_JOB_IS_FINISHED: Optional flag to wait until Hyperparameter Tuning is finished. (default: don't wait)
--use-spot-instances FLAG_TO_USE_SPOT_INSTANCES: Optional flag that specifies whether to use SageMaker Managed Spot instances for training. It should be used only for training jobs that take less than 1 hour. More information: https://docs.aws.amazon.com/sagemaker/latest/dg/model-managed-spot-training.html (default: False).
Example
sagify cloud hyperparameter-optimization -i s3://my-bucket/training-data/ -o s3://my-bucket/output/ -e ml.m4.xlarge -h local/path/to/hyperparam_ranges.json -v 60 -t 86400
Cloud Deploy
Name
Executes a Docker image in serve mode on AWS SageMaker
Synopsis
sagify cloud deploy --s3-model-location S3_LOCATION_TO_MODEL_TAR_GZ --num-instances NUMBER_OF_EC2_INSTANCES --ec2-type EC2_TYPE [--aws-tags TAGS] [--iam-role-arn IAM_ROLE] [--external-id EXTERNAL_ID] [--endpoint-name ENDPOINT_NAME]
Description
This command retrieves a Docker image from AWS Elastic Container Service and executes it on AWS SageMaker in serve mode. You can update an endpoint (model or number of instances) by specifying the endpoint-name.
Required Flags
--s3-model-location S3_LOCATION_TO_MODEL_TAR_GZ or -m S3_LOCATION_TO_MODEL_TAR_GZ: S3 location to to model tar.gz
--num-instances NUMBER_OF_EC2_INSTANCES or n NUMBER_OF_EC2_INSTANCES: Number of ec2 instances
--ec2-type EC2_TYPE or e EC2_TYPE: ec2 type. Refer to https://aws.amazon.com/sagemaker/pricing/instance-types/
Optional Flags
--aws-tags TAGS or -a TAGS: Tags for labeling a training job of the form tag1=value1;tag2=value2. For more, see https://docs.aws.amazon.com/sagemaker/latest/dg/API_Tag.html.
--iam-role-arn IAM_ROLE or -r IAM_ROLE: AWS IAM role to use for deploying with SageMaker
--external-id EXTERNAL_ID or -x EXTERNAL_ID: Optional external id used when using an IAM role
--endpoint-name ENDPOINT_NAME: Optional name for the SageMaker endpoint
Example
sagify cloud deploy -m s3://my-bucket/output/model.tar.gz -n 3 -e ml.m4.xlarge
Cloud Batch Transform
Name
Executes a Docker image in batch transform mode on AWS SageMaker, i.e. runs batch predictions on user defined S3 data
Synopsis
sagify cloud batch-transform --s3-model-location S3_LOCATION_TO_MODEL_TAR_GZ --s3-input-location S3_INPUT_LOCATION --s3-output-location S3_OUTPUT_LOCATION --num-instance NUMBER_OF_EC2_INSTANCES --ec2-type EC2_TYPE [--aws-tags TAGS] [--iam-role-arn IAM_ROLE] [--external-id EXTERNAL_ID] [--wait WAIT_UNTIL_BATCH_TRANSFORM_JOB_IS_FINISHED] [--job-name JOB_NAME]
Description
This command retrieves a Docker image from AWS Elastic Container Service and executes it on AWS SageMaker in batch transform mode, i.e. runs batch predictions on user defined S3 data. SageMaker will spin up REST container(s) and call it/them with input data(features) from a user defined S3 path.
Things to do: - You should implement the predict function that expects a JSON containing the required feature values. It's the same predict function used for deploying the model as a REST service. Example of a JSON:
{
    "features": [5.1,3.5,1.4,0.2]
}
- The input S3 path should contain a file or multiple files where each line is a JSON, the same JSON format as the one expected in the predict function. Example of a file:
{"features": [5.1,3.5,1.4,0.2]}
{"features": [4.9,3.0,1.4,0.2]}
{"features": [4.7,3.2,1.3,0.2]}
{"features": [4.6,3.1,1.5,0.2]}
Required Flags
--s3-model-location S3_LOCATION_TO_MODEL_TAR_GZ or -m S3_LOCATION_TO_MODEL_TAR_GZ: S3 location to to model tar.gz
--s3-input-location S3_INPUT_LOCATION or -i S3_INPUT_LOCATION: s3 input data location
--s3-output-location S3_OUTPUT_LOCATION or -o S3_OUTPUT_LOCATION: s3 location to save predictions
--num-instances NUMBER_OF_EC2_INSTANCES or n NUMBER_OF_EC2_INSTANCES: Number of ec2 instances
--ec2-type EC2_TYPE or e EC2_TYPE: ec2 type. Refer to https://aws.amazon.com/sagemaker/pricing/instance-types/
Optional Flags
--aws-tags TAGS or -a TAGS: Tags for labeling a training job of the form tag1=value1;tag2=value2. For more, see https://docs.aws.amazon.com/sagemaker/latest/dg/API_Tag.html.
--iam-role-arn IAM_ROLE or -r IAM_ROLE: AWS IAM role to use for deploying with SageMaker
--external-id EXTERNAL_ID or -x EXTERNAL_ID: Optional external id used when using an IAM role
--wait WAIT_UNTIL_BATCH_TRANSFORM_JOB_IS_FINISHED or -w WAIT_UNTIL_BATCH_TRANSFORM_JOB_IS_FINISHED: Optional flag to wait until Batch Transform is finished. (default: don't wait)
--job-name JOB_NAME: Optional name for the SageMaker batch transform job
Example
sagify cloud batch-transform -m s3://my-bucket/output/model.tar.gz -i s3://my-bucket/input_features -o s3://my-bucket/predictions -n 3 -e ml.m4.xlarge
Cloud Create Streaming Inference
NOTE: THIS IS AN EXPERIMENTAL FEATURE
Make sure that the following 2 policies are attached to the role you created in section "Configure AWS Account":

Name
Creates streaming inference pipelines
Synopsis
sagify cloud create-streaming-inference --name WORKER_NAME --endpoint-name ENDPOINT_NAME --input-topic-name FEATURES_INPUT_TOPIC_NAME --output-topic-name PREDICTIONS_OUTPUT_TOPIC_NAME --type STREAMING_INFERENCE_TYPE
Description
This command creates a worker as a Lambda function that listens to features in the FEATURES_INPUT_TOPIC_NAME, calls the the endpoint ENDPOINT_NAME and, finally, forwards predictions to PREDICTIONS_OUTPUT_TOPIC_NAME.
Required Flags
--name WORKER_NAME: The name of the Lambda function
--endpoint-name ENDPOINT_NAME: The name of the endpoint of the deployed model
--input-topic-name FEATURES_INPUT_TOPIC_NAME: Topic name where features will be landed
--output-topic-name PREDICTIONS_OUTPUT_TOPIC_NAME: Topic name where model predictions will be forwarded
--type STREAMING_INFERENCE_TYPE: The type of streaming inference. At the moment, only SQS is supported!
Example
sagify cloud create-streaming-inference --name recommender-worker --endpoint-name my-recommender-endpoint-1 --input-topic-name features --output-topic-name model-predictions --type SQS
Cloud Delete Streaming Inference
NOTE: THIS IS AN EXPERIMENTAL FEATURE
Make sure that the following 2 policies are attached to the role you created in section "Configure AWS Account":
Name
Deletes streaming inference pipelines
Synopsis
sagify cloud delete-streaming-inference --name WORKER_NAME --input-topic-name FEATURES_INPUT_TOPIC_NAME --output-topic-name PREDICTIONS_OUTPUT_TOPIC_NAME --type STREAMING_INFERENCE_TYPE
Description
This command deletes the worker (i.e. Lambda function), input topic FEATURES_INPUT_TOPIC_NAME and output topic PREDICTIONS_OUTPUT_TOPIC_NAME.
Required Flags
--name WORKER_NAME: The name of the Lambda function
--input-topic-name FEATURES_INPUT_TOPIC_NAME: Topic name where features will be landed
--output-topic-name PREDICTIONS_OUTPUT_TOPIC_NAME: Topic name where model predictions will be forwarded
--type STREAMING_INFERENCE_TYPE: The type of streaming inference. At the moment, only SQS is supported!
Example
sagify cloud delete-streaming-inference --name recommender-worker --input-topic-name features --output-topic-name model-predictions --type SQS
Cloud Lightning Deploy
Name
Command for lightning deployment of pre-trained ML model(s) on AWS SageMaker without code
Synopsis
sagify cloud lightning-deploy --framework FRAMEWORK --num-instances NUMBER_OF_EC2_INSTANCES --ec2-type EC2_TYPE --aws-profile AWS_PROFILE --aws-region AWS_REGION --extra-config-file EXTRA_CONFIG_FILE [--model-server-workers MODEL_SERVER_WORKERS] [--s3-model-location S3_LOCATION_TO_MODEL_TAR_GZ] [--aws-tags TAGS] [--iam-role-arn IAM_ROLE] [--external-id EXTERNAL_ID] [--endpoint-name ENDPOINT_NAME]
Description
This command deploys a pre-trained ML model without code.
Required Flags
--framework FRAMEWORK: Name of the ML framework. Valid values: sklearn, huggingface, xgboost
--num-instances NUMBER_OF_EC2_INSTANCES or n NUMBER_OF_EC2_INSTANCES: Number of ec2 instances
--ec2-type EC2_TYPE or e EC2_TYPE: ec2 type. Refer to https://aws.amazon.com/sagemaker/pricing/instance-types/
--aws-profile AWS_PROFILE: The AWS profile to use for the lightning deploy command
--aws-region AWS_REGION: The AWS region to use for the lightning deploy command
--extra-config-file EXTRA_CONFIG_FILE: Json file with ML framework specific arguments
For SKLearn, you have to specify the framework_version in the EXTRA_CONFIG_FILE and specify the S3 location to model tar.gz (i.e. tar gzip your sklearn pickled file
Optional Flags
--s3-model-location S3_LOCATION_TO_MODEL_TAR_GZ or -m S3_LOCATION_TO_MODEL_TAR_GZ: Optional S3 location to model tar.gz
--aws-tags TAGS or -a TAGS: Tags for labeling a training job of the form tag1=value1;tag2=value2. For more, see https://docs.aws.amazon.com/sagemaker/latest/dg/API_Tag.html.
--iam-role-arn IAM_ROLE or -r IAM_ROLE: AWS IAM role to use for deploying with SageMaker
--external-id EXTERNAL_ID or -x EXTERNAL_ID: Optional external id used when using an IAM role
--endpoint-name ENDPOINT_NAME: Optional name for the SageMaker endpoint
Example for SKLearn
Compress your pre-trained sklearn model to a GZIP tar archive with command !tar czvf model.tar.gz $your_sklearn_model_name.
sagify cloud lightning-deploy --framework sklearn -n 1 -e ml.c4.2xlarge --extra-config-file sklearn_config.json --aws-region us-east-1 --aws-profile sagemaker-dev -m s3://my-bucket/output/model.tar.gz
The sklearn_config.json must contain the following flag framework_version. Supported sklearn version(s): 0.20.0, 0.23-1.
Example of sklearn_config.json:
{
    "framework_version": "0.23-1"
}
Example for HuggingFace by specifying the S3_LOCATION_TO_MODEL_TAR_GZ
Compress your pre-trained HuggingFace model to a GZIP tar archive with command !tar czvf model.tar.gz $your_hg_model_name.
sagify cloud lightning-deploy --framework huggingface -n 1 -e ml.c4.2xlarge --extra-config-file huggingface_config.json --aws-region us-east-1 --aws-profile sagemaker-dev -m s3://my-bucket/output/model.tar.gz
The huggingface_config.json must contain the following flags pytorch_version or tensorflow_version (not both), and transformers_version. For more info: https://sagemaker.readthedocs.io/en/stable/frameworks/huggingface/sagemaker.huggingface.html#hugging-face-model.
Example of huggingface_config.json:
{
    "transformers_version": "4.6.1",
    "pytorch_version": "1.7.1"
}
Example for HuggingFace without specifying the S3_LOCATION_TO_MODEL_TAR_GZ
sagify cloud lightning-deploy --framework huggingface -n 1 -e ml.c4.2xlarge --extra-config-file huggingface_config.json --aws-region us-east-1 --aws-profile sagemaker-dev
The huggingface_config.json must contain the following flags pytorch_version or tensorflow_version (not both), transformers_version and hub. For more info: https://sagemaker.readthedocs.io/en/stable/frameworks/huggingface/sagemaker.huggingface.html#hugging-face-model.
Example of huggingface_config.json:
{
    "transformers_version": "4.6.1",
    "pytorch_version": "1.7.1",
    "hub": {
    "HF_MODEL_ID": "gpt2",
    "HF_TASK": "text-generation"
    }
}
Example for XGBoost
Compress your pre-trained XGBoost model to a GZIP tar archive with command !tar czvf model.tar.gz $your_xgboost_model_name.
sagify cloud lightning-deploy --framework xgboost -n 1 -e ml.c4.2xlarge --extra-config-file xgboost_config.json --aws-region us-east-1 --aws-profile sagemaker-dev -m s3://my-bucket/output/model.tar.gz
The xgboost_config.json must contain the following flag framework_version. Supported xgboost version(s): 0.90-2, 1.0-1, and later.
Example of xgboost_config.json:
{
    "framework_version": "0.23-1"
}
Cloud Foundation Model Deploy
Name
Command for deployment of Foundation models on SageMaker without code
Synopsis
sagify cloud foundation-model-deploy --model-id MODEL_ID --model-version MODEL_VERSION --num-instances NUMBER_OF_EC2_INSTANCES --ec2-type EC2_TYPE --aws-profile AWS_PROFILE --aws-region AWS_REGION [--aws-tags TAGS] [--iam-role-arn IAM_ROLE] [--external-id EXTERNAL_ID] [--endpoint-name ENDPOINT_NAME]
Description
This command deploys a Foundation model without code.
Required Flags
--model-id MODEL_ID: Model id of the Foundation model. For more, see the list of Foundation models https://sagemaker.readthedocs.io/en/stable/doc_utils/pretrainedmodels.html.
--model-version MODEL_VERSION: Model verion of the Foundation model (default: 1.* which fetches the latest of this major version)
--num-instances NUMBER_OF_EC2_INSTANCES or n NUMBER_OF_EC2_INSTANCES: Number of ec2 instances
--ec2-type EC2_TYPE or e EC2_TYPE: ec2 type. Refer to https://aws.amazon.com/sagemaker/pricing/instance-types/
--aws-profile AWS_PROFILE: The AWS profile to use for the lightning deploy command
--aws-region AWS_REGION: The AWS region to use for the lightning deploy command
Optional Flags
--aws-tags TAGS or -a TAGS: Tags for labeling a training job of the form tag1=value1;tag2=value2. For more, see https://docs.aws.amazon.com/sagemaker/latest/dg/API_Tag.html.
--iam-role-arn IAM_ROLE or -r IAM_ROLE: AWS IAM role to use for deploying with SageMaker
--external-id EXTERNAL_ID or -x EXTERNAL_ID: Optional external id used when using an IAM role
--endpoint-name ENDPOINT_NAME: Optional name for the SageMaker endpoint
LLM List Platforms
Name
Command to list available backend LLM platforms
Synopsis
sagify llm platforms
Description
This command lists all the available backend LLM platforms.
LLM List Models
Name
Command to list available LLM models per platform/provider
Synopsis
sagify llm platforms --all --chat-completions --image-creations --embeddings [--provider PROVIDER_NAME]
Description
This command lists all the models per platform/provider.
Required Flags
--all: Show all LLMS. If this flag is used the flags --chat-completions, --image-creations, --embeddings are ignored.
--chat-completions: Show chat completions models.
--image-creations: Show image creations models.
--embeddings: Show embeddings models.
Optional Flags
--provider: Provider name. It can take of the 2 values sagemaker or openai. Default: sagemaker.
LLM Start Infrastructure
Name
Command to start LLM infrastructure
Synopsis
sagify llm start --all --chat-completions --image-creations --embeddings [--config EC2_CONFIG_FILE] --aws-profile AWS_PROFILE --aws-region AWS_REGION [--aws-tags TAGS] [--iam-role-arn IAM_ROLE] [--external-id EXTERNAL_ID]
Description
It spins up the endpoints for chat completions, image creation and embeddings.
Required Flags
--all: Start infrastructure for all services. If this flag is used the flags --chat-completions, --image-creations, --embeddings are ignored.
--chat-completions: Start infrastructure for chat completions.
--image-creations: Start infrastructure for image creations.
--embeddings: Start infrastructure for embeddings.
--config EC2_CONFIG_FILE: Path to config file to override foundation models, ec2 instance types and/or number of instances.
--aws-profile AWS_PROFILE: The AWS profile to use for the lightning deploy command
--aws-region AWS_REGION: The AWS region to use for the lightning deploy command
Optional Flags
--aws-tags TAGS or -a TAGS: Tags for labeling a training job of the form tag1=value1;tag2=value2. For more, see https://docs.aws.amazon.com/sagemaker/latest/dg/API_Tag.html.
--iam-role-arn IAM_ROLE or -r IAM_ROLE: AWS IAM role to use for deploying with SageMaker
--external-id EXTERNAL_ID or -x EXTERNAL_ID: Optional external id used when using an IAM role
LLM Stop Infrastructure
Name
Command to stop LLM infrastructure
Synopsis
sagify llm stop --all --chat-completions --image-creations --embeddings --aws-profile AWS_PROFILE --aws-region AWS_REGION [--aws-tags TAGS] [--iam-role-arn IAM_ROLE] [--external-id EXTERNAL_ID]
Description
It stop all or some of the services that are running.
Required Flags
--all: Start infrastructure for all services. If this flag is used the flags --chat-completions, --image-creations, --embeddings are ignored.
--chat-completions: Start infrastructure for chat completions.
--image-creations: Start infrastructure for image creations.
--embeddings: Start infrastructure for embeddings.
--aws-profile AWS_PROFILE: The AWS profile to use for the lightning deploy command
--aws-region AWS_REGION: The AWS region to use for the lightning deploy command
Optional Flags
--aws-tags TAGS or -a TAGS: Tags for labeling a training job of the form tag1=value1;tag2=value2. For more, see https://docs.aws.amazon.com/sagemaker/latest/dg/API_Tag.html.
--iam-role-arn IAM_ROLE or -r IAM_ROLE: AWS IAM role to use for deploying with SageMaker
--external-id EXTERNAL_ID or -x EXTERNAL_ID: Optional external id used when using an IAM role
LLM Gateway
Name
Command to build gateway docker image and start the gateway locally
Synopsis
sagify llm gateway --image IMAGE_NAME [--dockerfile-dir DOCKERFILE_DIR] [--platform PLATFORM] [--start-local]
Description
It builds gateway docker image and starts the gateway locally.
Required Flags
--image IMAGE_NAME: Docker image name to run. If not built already before, it will build it for you.
Optional Flags
--platform PLATFORM: Operating system. Platform in the format os[/arch[/variant]].
--start-local: Flag to indicate if to start the gateway locally.
LLM Batch Inference
Name
Command to execute an LLM batch inference job
Synopsis
sagify llm batch-inference --model MODEL --s3-input-location S3_INPUT_LOCATION --s3-output-location S3_OUTPUT_LOCATION --aws-profile AWS_PROFILE --aws-region AWS_REGION --num-instances NUMBER_OF_EC2_INSTANCES --ec2-type EC2_TYPE [--aws-tags TAGS] [--iam-role-arn IAM_ROLE] [--external-id EXTERNAL_ID] [--wait] [--job-name JOB_NAME] [--max-concurrent-transforms MAX_CONCURRENT_TRANSFORMS]
Description
This command triggers an batch inference job given an LLM model and an batch input.
- The input S3 path should contain a JSONL file or multiple JSONL files. Example of a file:
{"id":1,"text_inputs":"what is the recipe of mayonnaise?"}
{"id":2,"text_inputs":"what is the recipe of fish and chips?"}
Each line contains a unique identifier (id) and the corresponding text input (text_inputs). This identifier is crucial for linking inputs to their respective outputs, as illustrated in the output format below:
{'id': 1, 'embedding': [-0.029919596, -0.0011845357, ..., 0.08851079, 0.021398442]}
{'id': 2, 'embedding': [-0.041918136, 0.007127975, ..., 0.060178414, 0.031050885]}
By ensuring consistency in the id field between input and output files, you empower your ML use cases with seamless data coherence.
Required Flags
--model MODEL: LLM model name
--s3-input-location S3_INPUT_LOCATION or -i S3_INPUT_LOCATION: s3 input data location
--s3-output-location S3_OUTPUT_LOCATION or -o S3_OUTPUT_LOCATION: s3 location to save predictions
--num-instances NUMBER_OF_EC2_INSTANCES or n NUMBER_OF_EC2_INSTANCES: Number of ec2 instances
--ec2-type EC2_TYPE or e EC2_TYPE: ec2 type. Refer to https://aws.amazon.com/sagemaker/pricing/instance-types/
--aws-profile AWS_PROFILE: The AWS profile to use for the lightning deploy command
--aws-region AWS_REGION: The AWS region to use for the lightning deploy command
Optional Flags
--aws-tags TAGS or -a TAGS: Tags for labeling an inference job of the form tag1=value1;tag2=value2. For more, see https://docs.aws.amazon.com/sagemaker/latest/dg/API_Tag.html.
--iam-role-arn IAM_ROLE or -r IAM_ROLE: AWS IAM role to use for the inference job with SageMaker
--external-id EXTERNAL_ID or -x EXTERNAL_ID: Optional external id used when using an IAM role
--wait: Optional flag to wait until Batch Inference is finished. (default: don't wait)
--job-name JOB_NAME: Optional name for the SageMaker batch inference job
--max-concurrent-transforms MAX_CONCURRENT_TRANSFORMS: Optional maximum number of HTTP requests to be made to each individual inference container at one time. Default value: 1
Example
sagify llm batch-inference --model gte-small --s3-input-location s3://sagify-llm-playground/batch-input-data-example/embeddings/ --s3-output-location s3://sagify-llm-playground/batch-output-data-example/embeddings/1/ --aws-profile sagemaker-dev --aws-region us-east-1 --num-instances 1 --ec2-type ml.p3.2xlarge --wait